

One billion – that’s how many people use Instagram each month. With such a huge, highly engaged audience, you can bet the competition between brands is tough. This is why small details can make all the difference, and Instagram filters could play a part in making your social media campaigns more successful. What are Instagram Filters?Everywhere you look, marketing advice says you need high-quality images to succeed on platforms like Instagram. But what if you’re not a professional photographer? This is where Instagram filters can be a game-changer for your marketing and particularly your paid social media campaigns—they can make your images look as sleek as if they’d been professionally shot. Here’s an example of an unfiltered image vs. its filtered twin: 

Not only do Instagram filters make things look cleaner, but they also allow you to edit your image with one click. Where most editors make you alter contrast, saturation, and so forth individually, Instagram lets you pick a pre-set filter that suits your image—though you can tweak them if you’d like. While these filters have been around since 2011, they’ve taken off in recent years. With the added capabilities of augmented reality (AR) technology—which adds imaginary images to those of the real world—they can significantly impact your social media campaigns. Why Should You Use Instagram Filters in Your Paid Posts?Social media platforms are competitive, and standing out from the crowd isn’t easy. If you’re going to get the best cost per click with your paid social media campaigns, then your brand needs to grab attention and drive engagement. When you run an Instagram ad, you don’t have much real estate to work with, so you’ve got to find ways to draw your audience in with the limited space you have. If you can combine innovative use of filters with creative images and excellent text, then you could achieve exceptional results— as Opel did with their “Opel Adam” campaign. In just two weeks, the campaign achieved a 2.5x increase in registrations and significantly lowered Opel’s cost per registration. It’s possible to achieve the same results for your business, but you’ve got to make the most of the tools available to you. If only 18% of Instagram posts use a filter, this means you’ve got an opportunity to make your content stand out over the other 82%. Research shows that AR filters have an average dwell time of 75 seconds, which is four times that of even video content—so using it can make a huge difference. Social media platforms crave engagement, and if your advertisements give them that, you may find you reach more people for less—and Instagram filters are one of the best tools to help you achieve this. How to Use Instagram Filters for Your Paid CampaignsTurning your posts into paid campaigns through the Instagram app couldn’t be easier. All you need is a business or creator account, and then you can get set up with your paid ads.
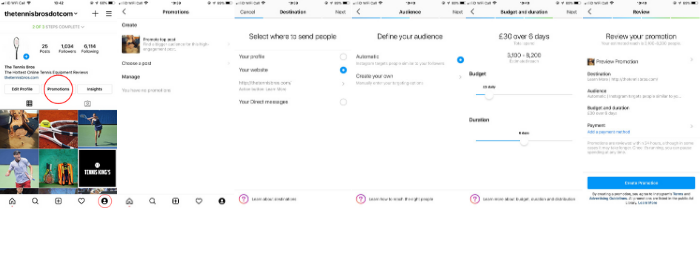
To create a promotion through the app, you need to have already created your post or story. Luckily, Instagram makes it exceedingly easy to snap an image on the go, add a great filter, and promote it within seconds. Tips for Picking the Right Instagram Filter for Your CampaignThe right Instagram filter might be a quick way to give your images the professional touch, but the wrong filter can have the opposite effect. When you’re choosing your filter, keep these three points in mind:
Your images help define your brand, so the filters you choose matter. Your filters should reflect the mood of the product or service you’re promoting, and you need to stay consistent with this. A great example of this is JetBlue’s Instagram account. You can easily spot how consistency has allowed them to develop their own simple yet effective style by using similar image styles, colors, and more. 
While the right filter can make things look amazing, “over filtering” can have the opposite effect. You don’t want to alter things so much that they look surreal. Instagram filters are optimized to please, so it’s often worth sticking to the tried and tested rather than over-editing. If you’re looking for inspiration, Canva studied the most popular filters, and Clarendon, Gingham, and Juno came out on top. Instagram Filters for PostsAdding filters to your Instagram posts couldn’t be easier. In five simple steps, you can post amazing images that grab your audience’s attention.

Instagram Filters for StoriesInstagram stories allow you to post photos and videos that vanish after 24 hours. One-third of the most viewed Instagram stories are created by businesses, so they are an excellent way to make your posts go further. The process of posting stories with filters is just as simple as with posts, but you’ll notice a lot more options when it comes to AR filters. For a live video or image:

Bonus Instagram Filter TipIf you’re scrolling through Instagram and see a filter you like, you can save it to use on your own stories.
Instagram Filters for FacesWhen you created your first story pin, you likely noticed there are a lot of things you can do to your face with AR. AR allows you to add computer-generated effects over the live image you see on your camera. For example, if you want to see what you look like wearing sunglasses, there’s an AR filter for that. The sunglasses appear on your face and follow you as you move. There are endless Instagram filters with AR, which gives you more options to engage your audience. However, as with any Instagram filters, it’s essential to find the ones that suit your brand. Some companies have had great success with AR filters on Instagram, such as this one by Ray-ban. But if you’re going to use these filters, then you’ve got to make sure you stay on-brand. 
To create a story with AR filters, simply follow these steps:

Other Instagram Features to Help Your Paid CampaignOne of the reasons Instagram is so popular with advertisers is because it gives you lots of tools to give your paid campaign extra oomph. The beautiful thing about it is it’s so easy for anyone to add filters, gifs, text, and music to their images. While a recent study found that images without text overlay generally perform better than those with text, marketing is all about finding the message that engages your audience, so it’s worth experimenting to find the formula that works for you. These Instagram features give you added options when it comes to reaching and engaging your target audience. Adding GifsGifs provide a great middle-ground between static images and video. They were talked about as a big marketing trend, and while AR has taken over somewhat, they’re still a handy tool for your paid Instagram campaigns. A gif is a quick and easy way to add something extra to your story, and once again, Instagram makes it exceptionally easy to do:
Adding TextInstagram might be a very visual platform, but that doesn’t mean there isn’t use for text. The right use of text can help give your posts and stories context, grabbing people’s attention and linking the image to your brand. Text is a vital part of Instagram because this is where you make use of one of the most important features: hashtags. Hashtags not only help people find your posts, but they also boost engagement and allow you to zero in on what’s popular in your industry. The statistics show that Instagram posts with even just one hashtag can see an increase in engagement of 12.6%. So with only a little extra text, you can give your campaigns a better chance of success. You can also use text overlay on your stories. You’re in control of your text’s font, color, and look, which means you have another way of giving your images a professional look. To add text overlay to your stories, simply:
Adding MusicMusic has always played an important part in advertising. Music helps make advertisements more memorable, evokes emotion, builds the story, and accentuates the brand, so it can be an essential tool. While some people will use Instagram with the sound off, Instagram makes it so easy to add features such as music that you don’t lose anything by using them. Again, make sure whatever you choose fits your brand and is going to engage your audience. Here’s how you can add music to your Instagram stories:
Instagram Filter Features Within Other Photography AppsYou might be thinking, “I want my Instagram posts to stand out, so why would I use the most common filters such as Clarendon?” While many brands find success with Instagram’s filters, you have other options if you choose to go that route. To help you with this, there are lots of photography apps that have curated Instagram filters you can pay for or give you the ability to create your own, including:
You may have to invest some time in finding or creating the perfect Instagram filter, but once it’s saved to your Instagram account, you can add it to all your posts and stories in seconds. ConclusionThe right Instagram filter can immediately improve your images and give your brand an identity. When you’re running paid media campaigns, you want to give your images and videos every chance of standing out from the crowd, and filters can help you achieve this. Instagram makes it incredibly easy to add this extra element to your posts. Turn your images into posts that people want to engage with and share, then watch how they may improve your paid social media campaigns. What’s the go-to Instagram filter for your brand? The post How to Use Instagram Filters in Paid Social Media Campaigns appeared first on Neil Patel. Original Entry: How to Use Instagram Filters in Paid Social Media Campaigns is shared from https://neilpatel.com/blog/instagram-filters-paid/ via https://neilpatel.com Check out the original post, How to Use Instagram Filters in Paid Social Media Campaigns that is shared from https://putyourfamilyfirst.wordpress.com/2020/11/13/how-to-use-instagram-filters-in-paid-social-media-campaigns/ via https://putyourfamilyfirst.wordpress.com
0 Comments
Despite how many PowerPoint presentations I’ve given in my life, I’ve always struggled with understanding the best practices for creating them. I know they need to look nice, but figuring out how to make them aesthetically pleasing and informative is tough. I’m sure my experience isn’t unique, as finding the correct balance between content, design, and timing can be difficult. Marketers know this more than anyone, as success in the role is often marked by being able to create engaging campaigns that tell a story and inspire audiences to take a specific action, like purchasing a product. However, PowerPoint presentations are different from advertisements. Understanding how to leverage your marketing knowledge when creating PowerPoints can be tricky. Still, there are various resources for marketers to use when creating presentations, one of which is the 10/20/30 rule. Coined by Guy Kawasaki, the rule is a tool for marketers to create excellent PowerPoint presentations. Each element of the formula helps marketers find a balance between design and conceptual explanations, so you can capture audience attention, emphasize your points, and enhance readability. Guy Kawasaki PowerPointGuy Kawasaki, one of the early Apple employees, championed the concept of a ‘brand evangelist’ to describe his position. He spent most of his time working to generate a follower base for Macintosh, the family of Apple computers. Today he works as a brand evangelist for Canva, an online graphic design tool. Given that he’s had significant experience giving presentations to captivate audiences, he’s figured out that the 10/20/30 is a successful formula to follow. Kawasaki’s book, Art of The Start, is where he first introduced the concept and described how it works. Let’s cover each part of the rule in more detail. 10 SlidesKawasaki believes that it’s challenging for audiences to comprehend more than ten concepts during a presentation. Given this, marketers should aim to create PowerPoints with no more than ten slides, i.e., ten ideas you’ll explain. Using fewer slides and focusing on the critical elements helps your audience grasp the concepts you’re sharing with them. In practice, this means creating slides that are specific and straight to the point. For example, say you’re presenting on the success of your recent campaign. Your marketing strategy was likely extensive, and you took a series of different actions to obtain your end result. Instead of outlining every aspect of your campaign, you would use your slides to outline its main elements of your strategy. This could look like individual slides for summarizing the problem you hoped to solve, your goals, the steps you took to reach your goals, and post-campaign analytics data that summarizes your accomplishments. It’s important to note that there shouldn’t be overwhelming amounts of text on your slides. You want them to be concise. Your audience should get most of the information from the words you’re speaking; your slides should be more supplemental than explanatory. 20 MinutesAfter you’ve spent time coming up with your ten key points, you’ll need to present them in 20 minutes. Knowing that you’ll only have 20 minutes also makes it easier to plan and structure your talk, as you’ll know how much time to dedicate to each slide, so you address all relevant points. Kawasaki acknowledges that presentation time slots can often be longer, but finishing at the 20-minute mark leaves time for valuable discussion and Q&A. Saving time in your presentation also leaves space for technical difficulties. 30 Point FontIf you’ve been in the audience during a presentation, you probably know that slides with small font can be challenging to read and take your attention away from the speaker. Kawasaki’s final rule is that no font within your presentation should be smaller than 30 point size. If you’ve already followed the previous rules, then you should be able to display your key points on your slides in a large enough font that users can read. Since your key points are short and focused, there won’t be a lot of text for your audience to read, and they’ll spend more time listening to you speak. Given that the average recommended font size for accessibility is 16, using a 30-point font ensures that all members of your audience can read and interact with your slides. Make Your Presentations More EngagingThe 10/20/30 rule of PowerPoint is meant to help marketers create powerful presentations. Each element of the rule works in tandem with the other: limiting yourself to 10 slides requires you to select the most salient points to present to your audience. A 20-minute timeline helps you ensure that you’re contextualizing those slides as you speak, without delving into unnecessary information. Using a 30-point font can act as a final check for your presentation, as it emphasizes the importance of only displaying key points on your slides, rather than huge blocks of text. Font size then circles back around to the ten slides, as you’ll craft sentences from your key points that will fit on your slides in 30-point font. Being mindful of slide count, text size, and presentation length ensures that your audiences are captivated by your words as you explain the value behind your work.
Original Entry: What Is the 10/20/30 Rule of PowerPoint? is shared from https://blog.hubspot.com/blog/tabid/6307/bid/1056/steve-jobs-guy-kawasaki-powerpoint-best-practices.aspx via https://blog.hubspot.com/marketing Check out the original post, What Is the 10/20/30 Rule of PowerPoint? that is shared from https://putyourfamilyfirst.wordpress.com/2020/11/12/what-is-the-10-20-30-rule-of-powerpoint/ via https://putyourfamilyfirst.wordpress.com 
Let’s talk about meta tags — what they are, why they matter, and how to do them better. First things first — what made you click on this article to read it? Maybe the title caught your eye, or perhaps it was the short blurb you saw. You might have clicked simply because this article comes from a source you trust. If you found this article via a search engine, though, there’s a good chance you found and clicked this article because of meta tags. Meta tags are the foundation of SEO, and the first thing you’ll find yourself setting up when building a web page. Without meta tags, you can’t reach readers organically. It doesn’t take much time to generate meta tags, but it’s more important than you might think. That’s because 93% of all online experiences begin with a search engine. 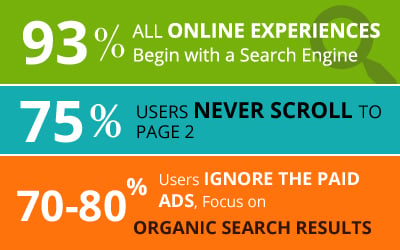
This is why so many online marketers are so focused on getting SEO right. Organic search traffic is the holy grail of SEO, so it can’t be ignored. 
Your content needs to be readable and appealing to users on search engines. There’s a very specific syntax needed. It’s similar to how bookstores and libraries organize their archives of books — and that’s what meta tags are, essentially. What are Meta Tags?Meta tags are a type of HTML tag that provides search engines with information about a website page. Let’s take a look at the basic elements. 
The title and description tags make up almost the entire entry. If not for these meta tags, all you’d see in Google SERPs would be my URL. 
Title and description tags are the two most-used tags for SEO purposes, but SEO isn’t the only part of digital marketing. Advanced digital marketing requires the use of even more tags that improve page rank and overall user experience. Just like this search result, you’ll soon find out that these tags control how your entire digital presence is viewed and navigated. Machines can read URLs just fine. If I wrote for machines, my website would look like this: 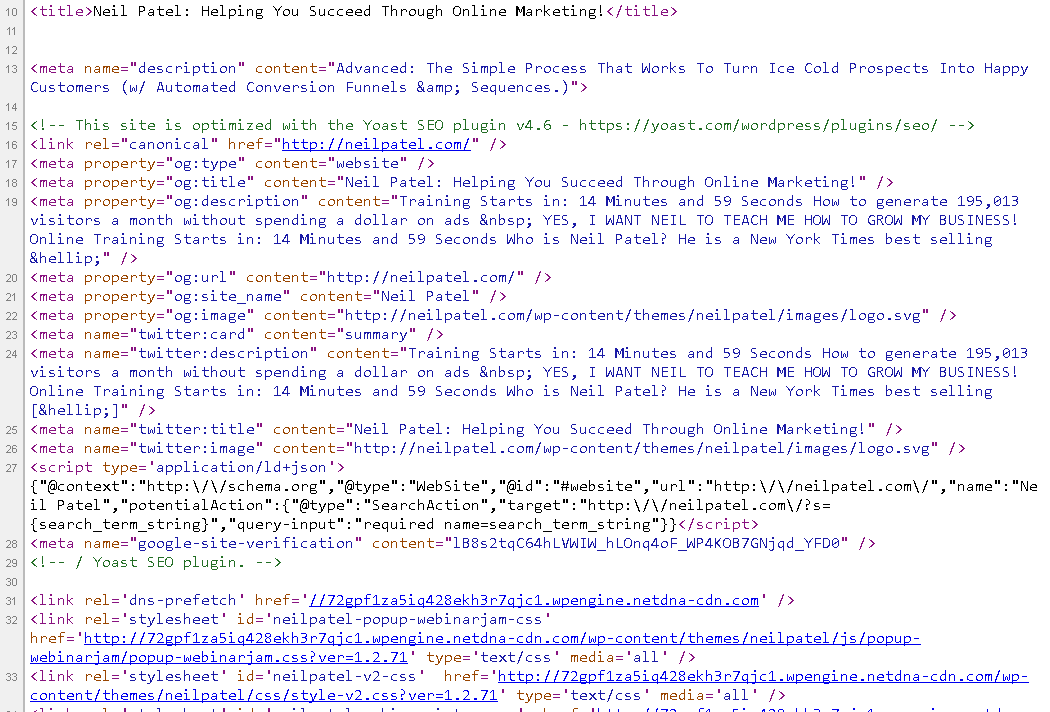
Google prioritizes certain tags because they provide context for people. I built my website for people as well, so it looks like this: 
This polish is what marketing is all about. In this blog post, we will explore meta tags and see how they affect your overall digital marketing efforts. While simple, the devil is in the details, and every detail counts. How Meta Tags Affect Brand Image and Click-Through RatesYou absolutely can judge a book by its cover. It’s what covers are designed for. Your title and meta description tag create the cover for your web page. They’re your first impression on most visitors. It’s not just about search engines, but how we view the Internet. Reddit is a basic link-aggregation site that takes away all the bells and whistles. Reddit depends on the title and image to entice conversations and clicks. 
Using meta tags correctly is like using the correct format for a business email. Sure, you can put whatever you like out there, but there’s a level of professionalism that’s expected at some point. Even Amazon will only give you a picture, title, and short description to make your point. 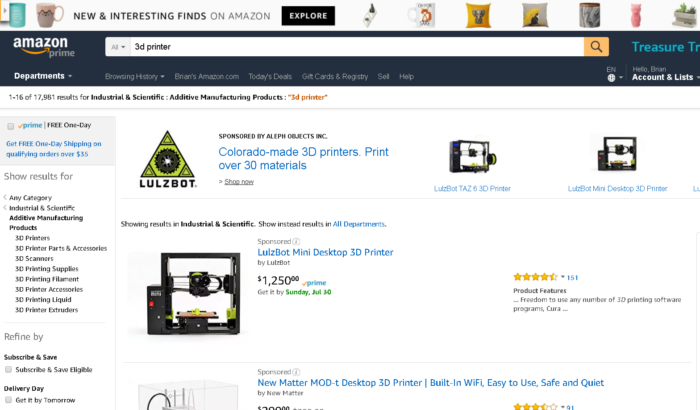
Think of these tags as your elevator pitch. You’re given about as much space as a Tweet to sell your entire brand and product. Which means you need to nail it. You can’t just call in this detail and polish everything else. If you do, nobody will ever see the rest of what you polished. We already know how meta tags affect SEO, but that’s not the only element. Meta tags will make your email marketing and marketing automation efforts easier by providing information for emailed links. Tags are a crucial element that determines what my automated social media posts look like. 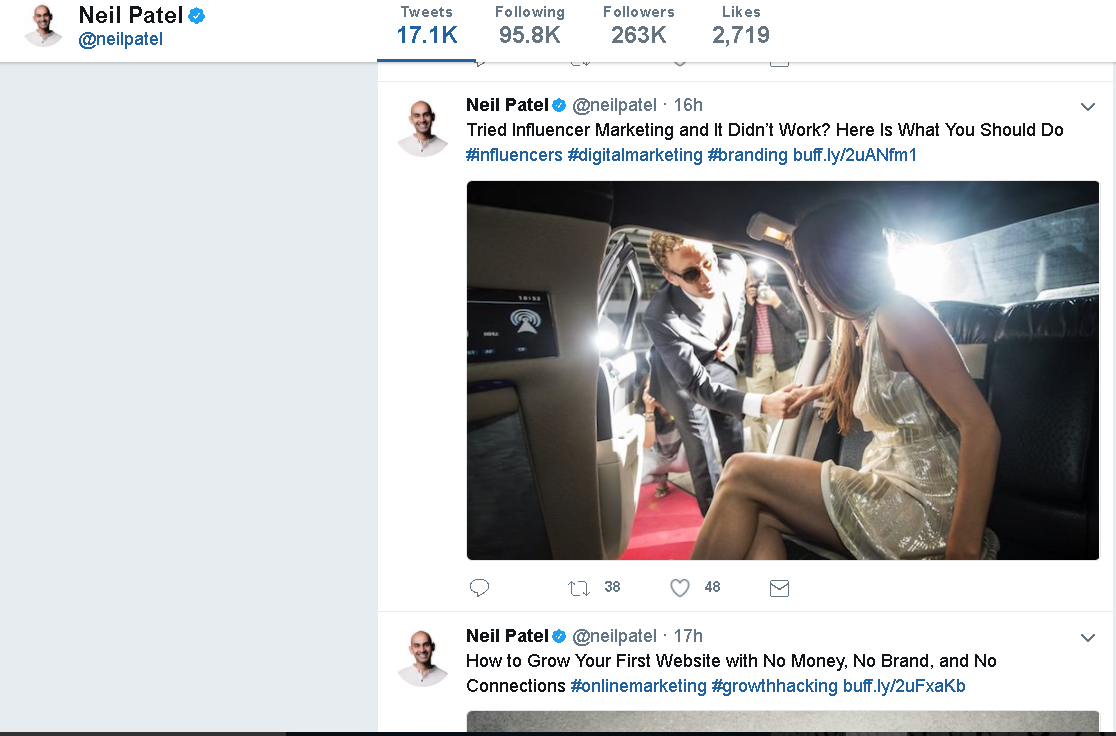
When other bloggers, YouTubers, and social media influencers (and micro-influencers) share your content, tags make it easier. Think of meta tags as the packaging for your product. If your packaging isn’t spot-on, nobody will ever buy your product, no matter how great it is! So what are some best practices to implement for tags? Meta Tag Best PracticesThere are a TON of different HTML tags that can be used on a web page. We’re only going to focus on a handful of significant tags. We’ll start with the one that might have brought you here today. 1. Title TagsIt’s not technically a meta tag, but it shows up in the header and is used as one. As of July 2017, the character limits for title tags in Google search results are 78 on mobile devices and 70 on a desktop. However, that doesn’t necessarily mean you should use all those characters, and 60 is the generally recommended limit. Long-tail keywords make a difference. Here are the top meta titles in the SERPs for “How to make content marketing effective.” 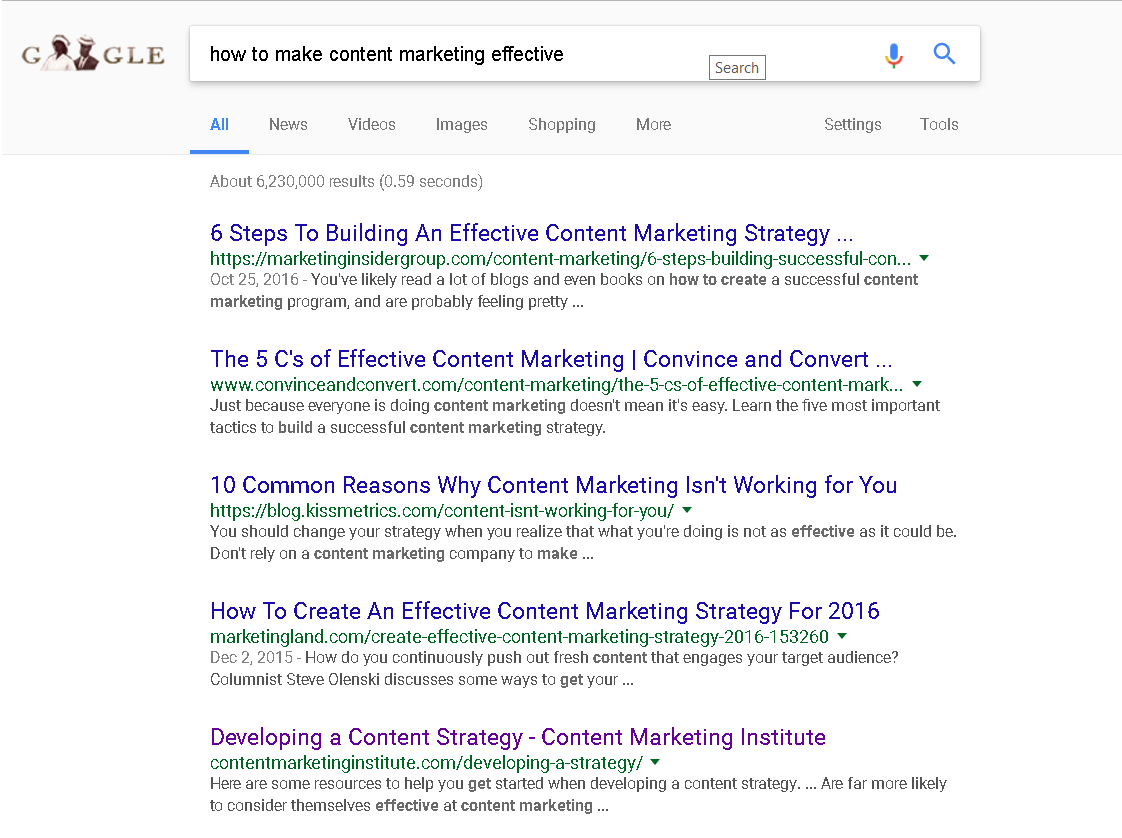
By adding the year, we get an entirely new set of results for “how to make content marketing effective 2017.” Some users will want basic information, while others will want the most current. 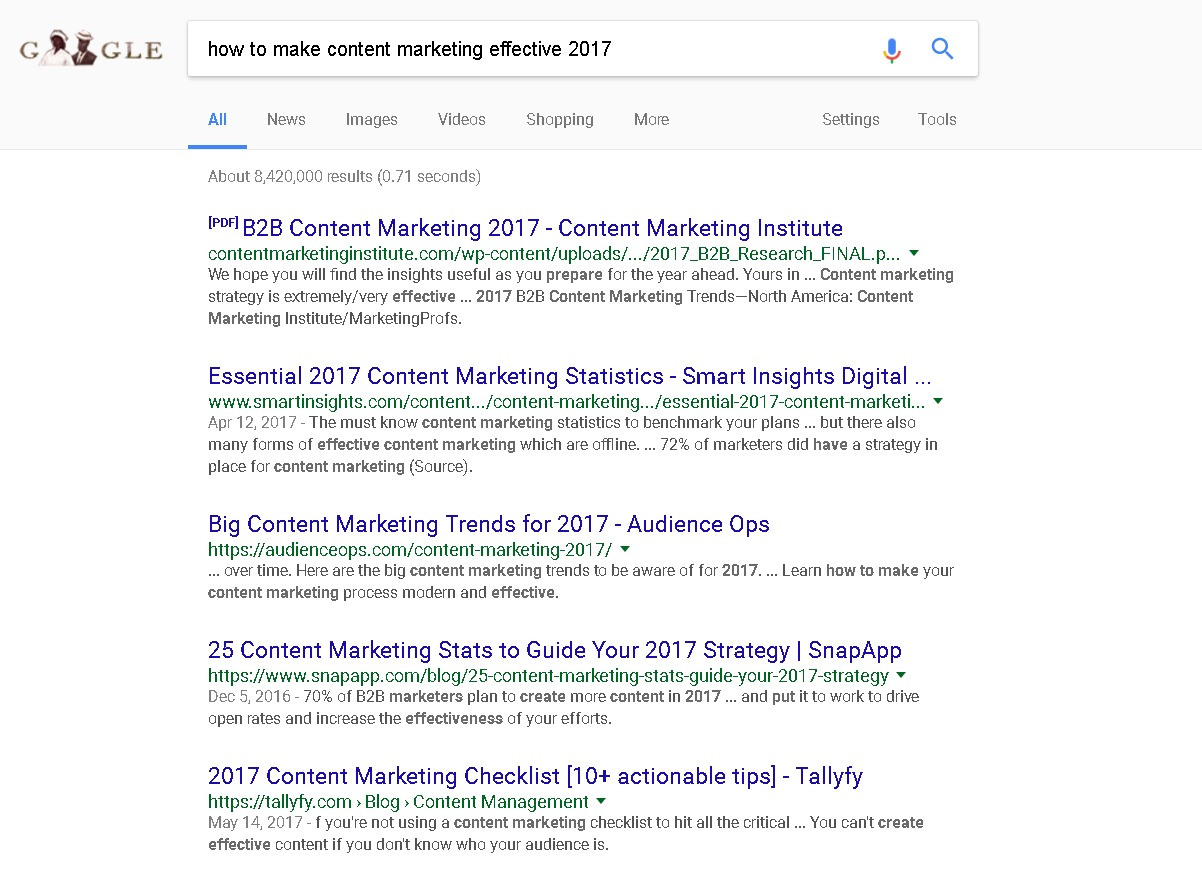
By adjusting our title tag, we can affect which of these searches we rank for. Ultimately, the goal is to hit both, but that’s not always feasible. Make sure your keyword is in your title, or you’ll find your articles buried in search results. For example, when I search for the “best tacos in Tucson,” some restaurants are on page 10 below, even Del Taco. That’s a wasted opportunity for that taco capital of the country! 
These small businesses could greatly improve their search results, sales, and ROI by simply adding “best tacos in Tucson” to their title tags. Here’s a sample of the HTML required for a title tag located in your header. <head> <title>The Best Title Example I Could Come Up With</title> </head> In WordPress, it’s as easy as giving your page a title. You really can’t miss it. 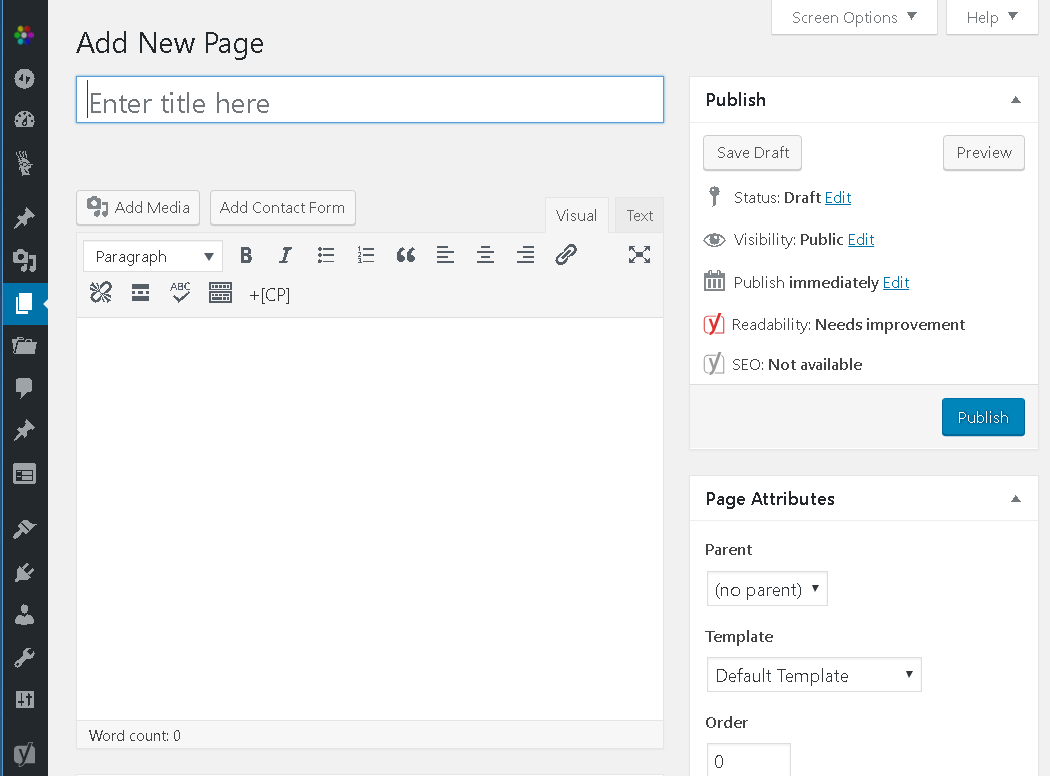
That’s all there is to it! 2. Image TagsLike title tags, Image tags aren’t labeled “meta.” But they’re clearly used by search engines, link aggregators, and other sites to identify your site. There are two image descriptions actually crammed into one tag. Here’s what the HTML code looks like. <img src=“image.jpg” alt=“image description” title=“image tooltip”> Both the alt and title tags should be defined for the best experience. The title displays on your screen when you hover your cursor over it. The alt text displays when the image can’t be rendered (or is spoken to the blind and visually impaired). When uploading an image to WordPress, you’ll be prompted to enter the title, caption, alt text, and description. 
The more fields you fill out (even if you use the same information), the more searchable your images become. Anywhere from 20-60% of all Google traffic goes to sites with well-optimized graphics. Why wouldn’t you want to be included? It’s also a matter of ADA website compliance. There are approximately 58,200 people with some level of visual impairment per million in the U.S. alone. 
That’s a huge segment of the population that wouldn’t have a great user experience without alt image tags. Optimize your images for search engines and users. 3. Description Meta TagsA meta description tag gives you a chance to provide an overview of the page’s content. They’re limited to around 160 characters and aren’t directly tied to Google’s search algorithms at all! Once again, the reason you need description tags is to improve the user experience. Description tags encourage click-throughs. Here’s what the HTML looks like: <head> Without a meta description, Google will default to whatever preview sentence it feels best encompasses the content. This isn’t necessarily a bad thing. This post doesn’t have a meta description (I rarely use them), and it ranks well. 
Of course, my blogs are filled with relevant content in short, sweet sentences. Most of them would work as descriptions on their own. Still, there’s no harm in adding additional information to make your content more searchable. 4. Robots Noindex and Nofollow Meta TagsRobot meta tags aren’t always necessary. By default, all of the pages and links you create on your website are indexed as ‘follow’ by search bots and web crawlers. Whenever you want to redirect them, you’ll need a robot meta tag. Here’s the noindex HTML code: <html><head> This would be within the header and indicate this page doesn’t need to be indexed. It’s useful for syndicated and duplicate content that your customers/readers could use, but you don’t want credit in search indexes. Here’s the HTML for a robot nofollow. <meta name=”robots” content=”nofollow”> This is used for links you don’t necessarily want to endorse. For example, readers leaving links in my comments aren’t exactly endorsed by me, so a nofollow tag above the comments section keeps my site clean for bots. Here’s a great infographic on when and how to use nofollow tags. 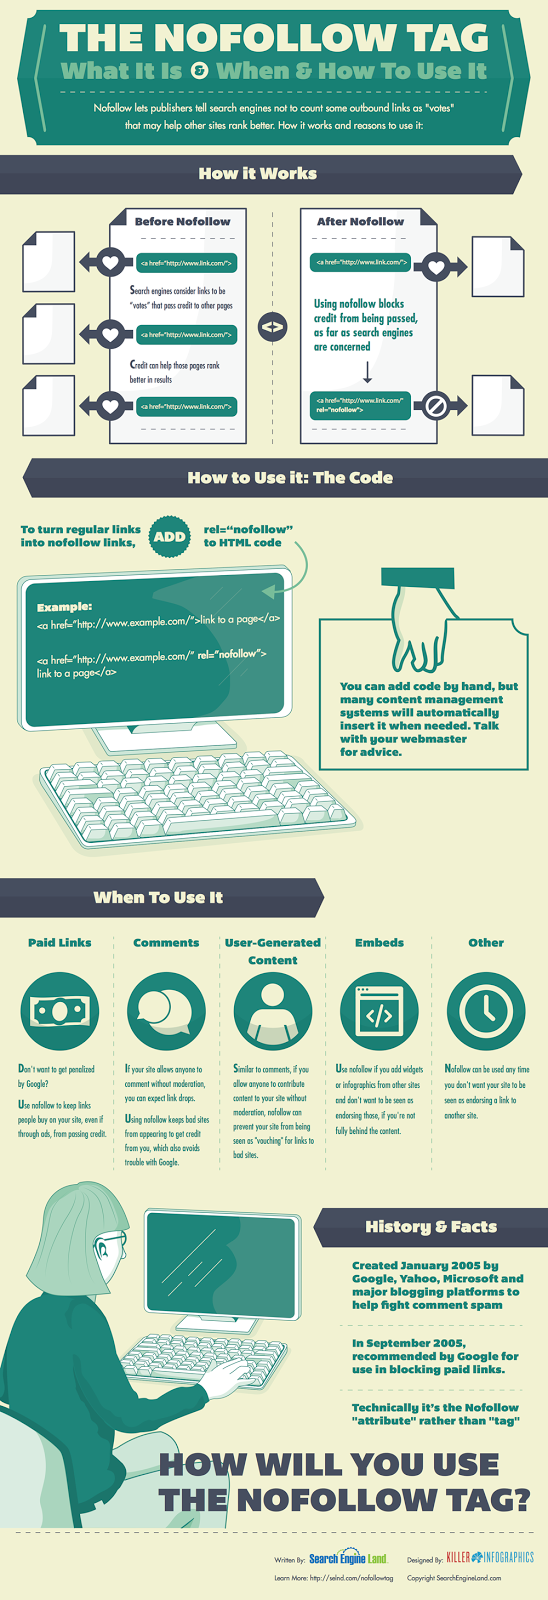
Now we get to one of the most controversial meta tags. 5. Keyword Meta TagsKeyword tags aren’t used by search algorithms to determine search ranking. Here’s what the HTML looks like: <meta name=”keywords” content=”HTML, CSS, XML, JavaScript”> I coach my SEO clients to ignore keyword tags because they don’t affect SEO. That doesn’t necessarily make them useless, however. They’re especially useful in WordPress. Keyword tags and categories can help Google determine which page on your site should rank for a search. They also create a page in WordPress that provides one more indexed page. 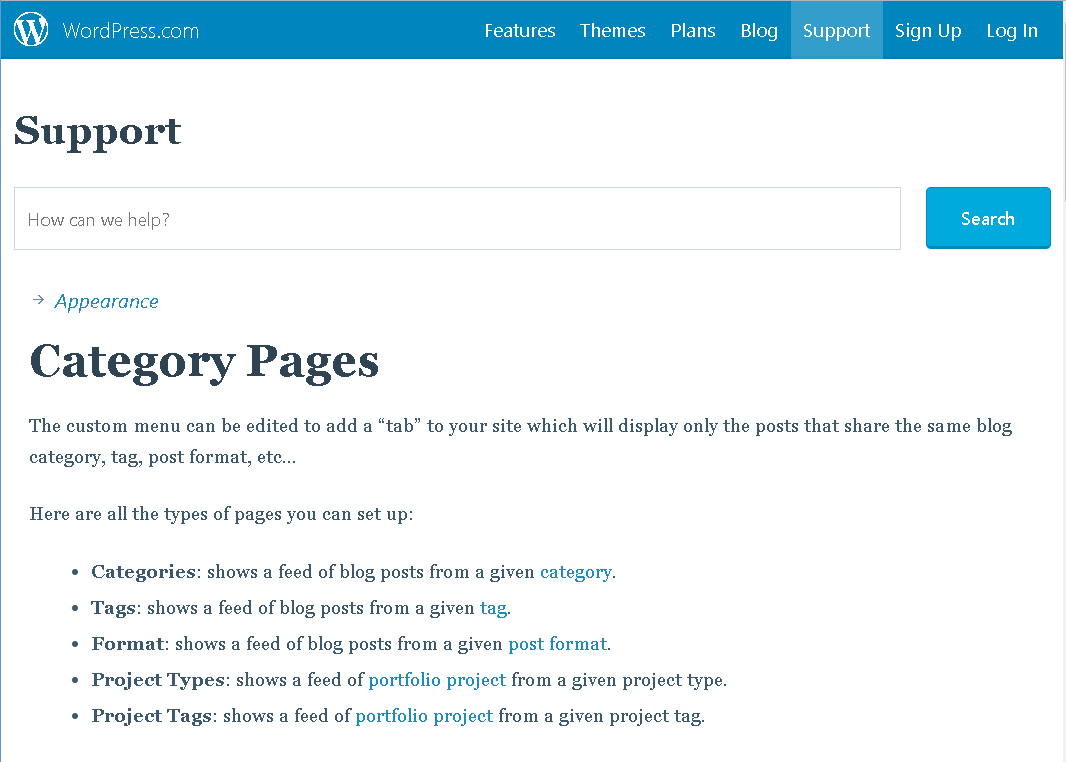
This means that, while your blog posts are focused on long-tail keywords, your tag and category pages have feeds covering the shorter keywords. Categories can be used for the URL format, providing one more keyword to the page address. This is accomplished under Settings – Permalinks in WordPress. 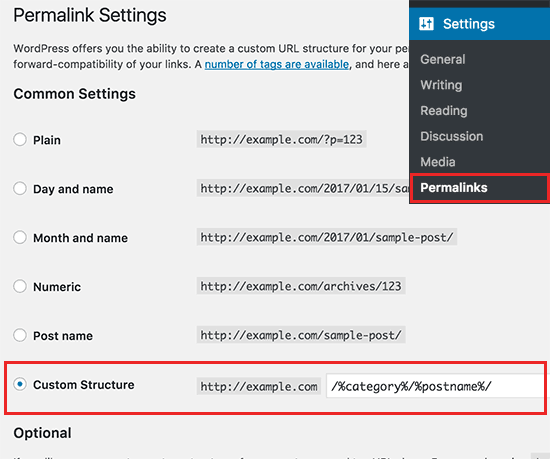
Adding this format provides context to your content. Google loves context for search results! Keywords also provide a big-picture overview of how many pages you have for each keyword. You can use them to help plan your editorial calendar. 6. Viewport tagsYou don’t spend much time thinking about viewports, but they’re especially important in today’s mobile-first world of search. On mobile devices, pages are shown in a popup window called a viewport that extends past the device’s border. Here’s an illustration of what I’m talking about. 
Developers can set the viewport size to increase mobile usability. WordPress users can check this tag to learn this information for their templates. But you probably didn’t know that unless you’re already a web developer. Since Google increasingly focuses on mobile-friendly websites, this meta tag could mean the difference between success and mobile failure. Now that you have a basic understanding of meta tags and why they’re important, I’ll show you some of my favorite tools for manipulating them. Free Tools to Add and Check Your Meta TagsDon’t worry if this all sounds overwhelming — there are tons of tools to make it easy to get meta tags right. Here are two of my favorites. Yoast SEO Plugin for WordPressYoast is a powerful SEO plugin for WordPress and one of the most-downloaded SEO and meta tags tools. With Yoast, all of the pages and posts you publish have back-end options to increase social sharing, optimize SEO, update tags, and other metadata. 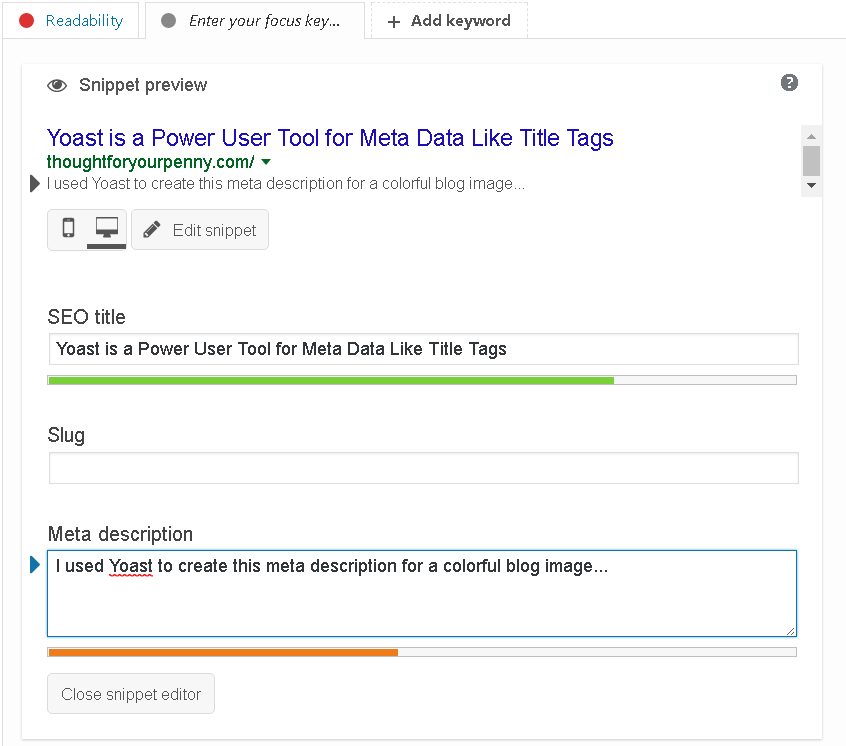
With Yoast installed on your WordPress site, a few clicks and a few seconds of your time are all it takes to add meta-tagging to your process. Yoast also allows you to enter a focus keyword that doesn’t get added to the meta tags, allowing the back-end program to analyze your post. BuzzStream Meta Tag ExtractorIf you need a quick chart of the metadata that’s being used by your competition, BuzzStream’s Meta Tag Extractor is a sleek and simple solution. Copy and paste a list of URLs, and you’ll be presented with the meta tag information. 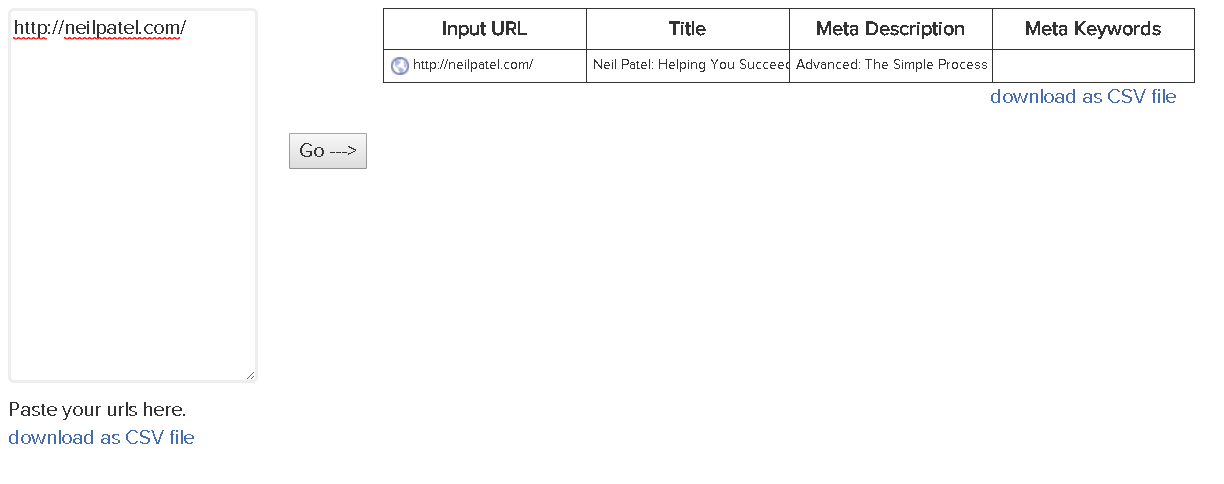
There’s even an option to download as a CSV file so that you can scrape large lists quickly. It’s a quick and easy way to organize this data when you need it. This free online tool does its job without all the bells and whistles. Less Popular (But Still Useful!) Meta TagsSo to be fully transparent, here’s a chart of HTML meta tags. 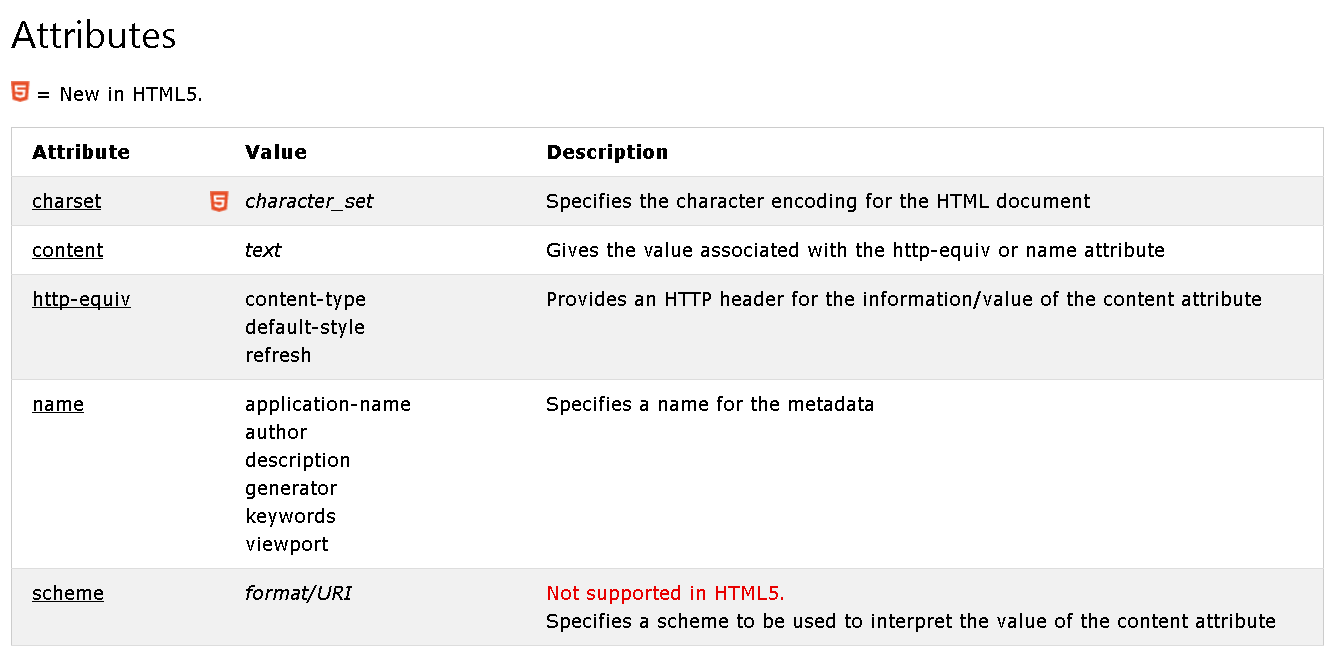
An author meta tag can be used to tell search engines who wrote a piece of content. Authors have been used in the past for search results, but it’s not a factor anymore. However, you might use author tags if you run a multi-author blog. WordPress does add this information to blogs when multiple users are contributing content. It’s more a badge of honor for bloggers than anything else. Most of the rest define parameters that should already be controlled on a server level. While I ignored these meta tags, it doesn’t mean you have to. Feel free to add whatever information you’d like. It doesn’t help search rankings, but it doesn’t hurt them, either. ConclusionMeta tags are a basic part of HTML — and can impact SEO. Back in the early days of the internet, they were a signaling factor for search engines to understand what content is on a page. The internet (and our relationship with it) has evolved exponentially since then. Contextual search, AI digital assistants, and mobile devices are changing the way we view content. Search engines are incentivized to provide the best search results possible, so meta tags are less important. However, some, such as the titles and meta descriptions, are more important than ever before. While less metadata is used, it’s still the first impression you’ll make on both robots and people. What do your website’s meta tags say about you? The post What Are Meta Tags? appeared first on Neil Patel. Original Entry: What Are Meta Tags? is shared from https://neilpatel.com/blog/why-meta-tags-are-so-important/ via https://neilpatel.com Check out the original post, What Are Meta Tags? that is shared from https://putyourfamilyfirst.wordpress.com/2020/11/12/what-are-meta-tags/ via https://putyourfamilyfirst.wordpress.com 
Pay-Per-Click (PPC) marketing can be one of the quickest and most effective ways to drive customers to your site. But it can be hard to make money through PPC ads. It’s all too easy to make common mistakes that can wreck your campaign. Luckily for you, I’ve got plenty of tips that can help. And there’s one strategy I’ve borrowed from my business analyst friends, which I’m going to share with you today. It’s called a SWOT analysis. A SWOT analysis can help you see a different side to your PPC campaign and improve its performance in the process. This article will help you carry out your own analysis and take your PPC campaigns to another level. What is a SWOT Analysis?A SWOT analysis is a corporate evaluation technique that can be used to assess anything from an entire company right down to a single PPC campaign. So, what does SWOT stand for? It stands for Strengths, Weaknesses, Opportunities, and Threats. Strengths and weaknesses are internal factors, things you control. Opportunities and threats are external factors. These are happening in the market right now, whether you like it or not. You may not be able to change them, but you can react to them. Typically, SWOT analysis is used at an operational level to help business leaders assess a company’s current position in the market and highlight areas for future growth. It can also be used to assess your PPC campaigns. A SWOT analysis can show you how well your campaign is performing, what’s holding you back, and how you can improve. Why Your Company Should Do SWOT Analysis for PPC CampaignsA SWOT analysis should be considered essential if you don’t want your PPC campaigns to fail. Too often, when brands try to optimize their PPC advertising, they look at their campaigns in isolation. They only analyze their own keywords, bids, and landing pages. But your PPC campaigns don’t exist in a vacuum. You are competing with hundreds of other brands for the same cherished three or four spots. A SWOT analysis will help you to understand external factors that may impact your PPC campaigns. Things like competitors, the economy, and the state of your industry can all affect the performance of your ads and the likelihood that someone will buy when they click them. You’ll also identify new opportunities for your campaign. That could be doubling down on what you do well, or it could be fixing one of your weaknesses. When you lay out what’s working and what’s not, it’s much easier to put together a plan that involves more than just raising your bids. Ultimately, it will help you to look at your PPC campaigns in a different way. Despite the wealth of advice out there on optimizing PPC campaigns, it’s easy to get stuck in a routine of researching keywords, testing new ad copy, and creating new landing pages. There’s much more you can be doing to improve your campaigns, and a SWOT analysis will help you take your PPC campaigns to the next level. How to Do a SWOT Analysis of Your PPCAll you need to do is sit down and brainstorm each of your campaign’s strengths, weaknesses, opportunities, and threats. They are typically displayed in a 2×2 grid. 
But you can just make a list below each header if that’s easier. It can help to have a goal in mind when starting your SWOT analysis. By focusing on your PPC campaigns, you have already narrowed your focus, but can you get an even clearer picture of what you want to achieve? Maybe you want to figure out why your PPC campaign isn’t driving as many sales as your Facebook ads, for instance. Or find ways to maximize what is already a profitable channel. It’s best to do a SWOT analysis with more than one person. The more views and opinions you can capture, the more complete a picture you’ll be able to develop. You can brainstorm together or complete the analysis individually, coming together at the end to share your thoughts. Finally, try to keep things as even as possible when brainstorming. If you have 10 strengths, find 10 weaknesses. Find a threat for every opportunity. You get the picture. SWOT Analysis S: StrengthsStart by making a list of all the strengths of your PPC campaign. Strengths are all the internal positive factors about your PPC efforts. For instance, maybe you have an excellent ROI or a high Quality Score. Covering hundreds of relevant keywords could also be a strength, as could your CTR or bounce rate. Think about the advantages you hold over the competition, too. That could be the PPC agency you partner with, for instance. It could even be the quality of your products or the strength of your brand. There’s no reason to limit your strengths to things that are specific to your PPC campaign. Don’t be modest, here! Now’s the time to boast if ever there was one. 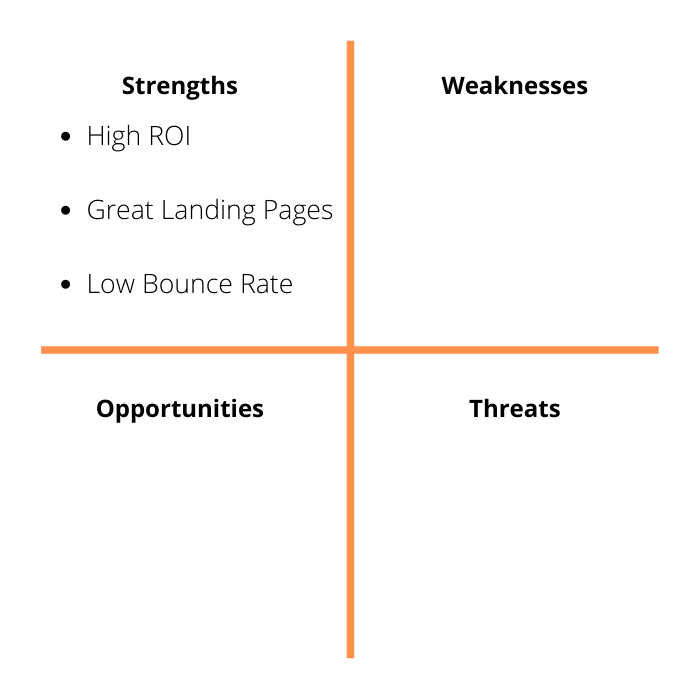
SWOT Analysis W: WeaknessesNext, examine your PPC campaign’s weaknesses. These are things you are in control of that are stopping you from increasing your ROI and generating more revenue. They could also be things your campaign currently lacks, like A/B testing. But they could also be broader weaknesses like a small budget or a lack of PPC experts. Remember to only include things you have control over in this category. Having a bigger, better-funded competitor is not a relevant weakness of your campaign. Operating in a very competitive market is, on the other hand. You can’t control your competitor, but you can choose not to compete. Or at least not compete directly. When in doubt, look at your strengths section and think about the opposite. 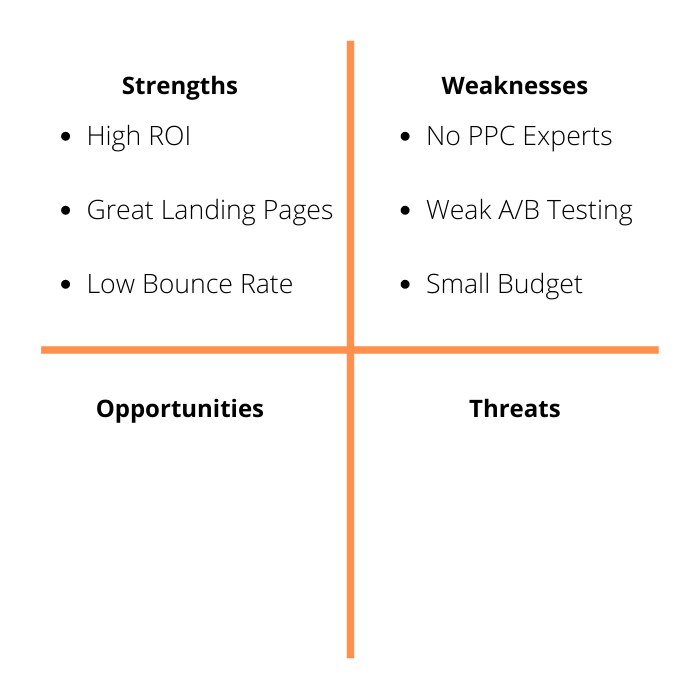
SWOT Analysis O: OpportunitiesNow consider any external positive factors that could improve your PPC campaigns in the future. You could be launching a new advertising campaign, for instance, that would increase the demand for your product. Maybe a competitor is on the verge of bankruptcy or is pivoting their business model. Take into account the time frame of these opportunities. A new marketing campaign may only increase demand for a few months, whereas ongoing market growth (like the acceleration of e-commerce) may last for years. Don’t forget to combine what you’ve done so far by including weaknesses that can be turned into strengths. 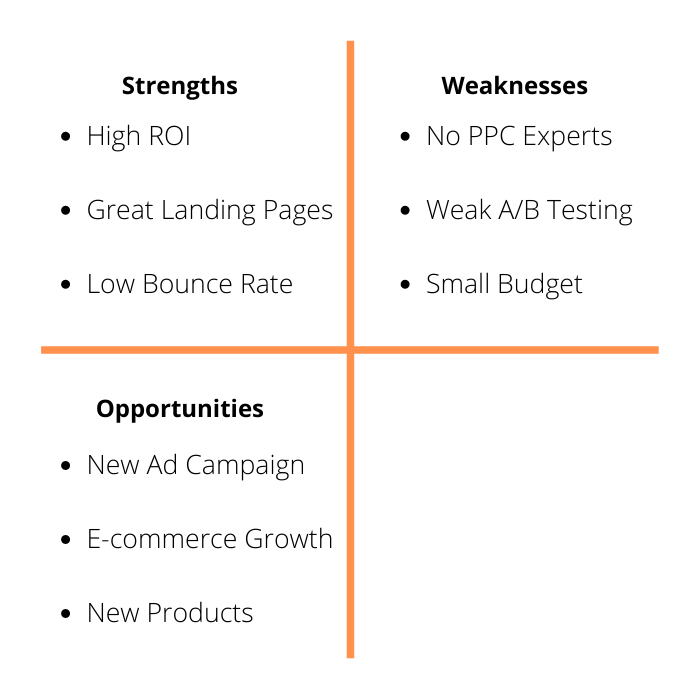
SWOT Analysis T: ThreatsFinally, look at threats to your PPC campaign. These are also external factors that you have little to no control over. And this is where you’d list those bigger, better-funded competitors who are constantly outbidding you. It’s not just your competitors you need to consider, however. What’s the market like for your current product? Are consumers shopping somewhere other than Google? Could anything change that would impact your success, like one of your employees taking a new job? It can help to think about your company and your industry at a broader level, too. Does your product risk becoming obsolete, for instance? Or could changes to the market weaken demand for your offering? 
Visualizing and Displaying Your SWOT AnalysisThere are several different methods to display your SWOT analysis. As I have shown above, the most common format of a SWOT analysis is a 2×2 chart. This makes it easy to visualize your analysis as a whole, as every section is displayed in relation to each other. But it’s not the only way you can display your SWOT analysis. There are plenty of ways to make your analysis more digestible and visually engaging. Check out this graphic analysis of a Nike SWOT by Business Strategy Hub. 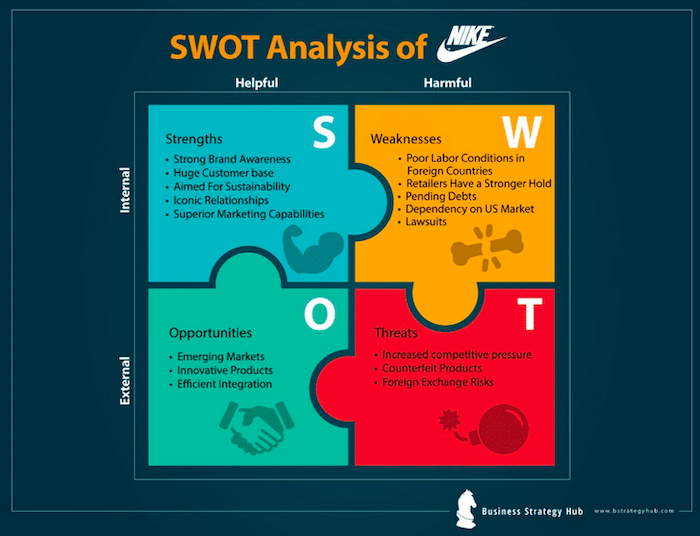
Or this creative McDonalds SWOT graphic by Creately. 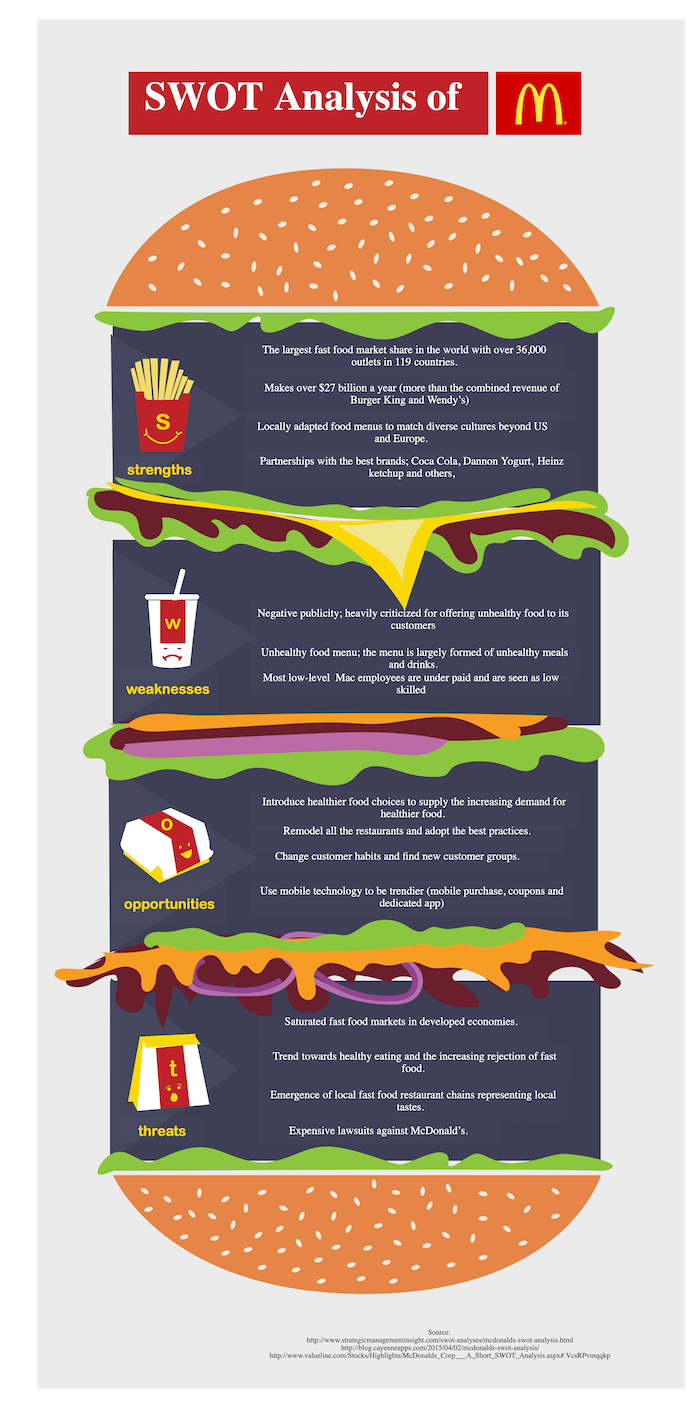
If design isn’t your forte, Lucidchart has a SWOT analysis generator you can use instead. Making Your SWOT Analysis ActionableOne problem with a SWOT is that it doesn’t produce actionable results. It only helps you understand where you currently are. You need to make your analysis actionable. Start by looking at the relationship between each section. For instance, ask yourself whether you can use your strengths to create new opportunities, or whether you can remove threats by improving your weaknesses. Let’s start by looking at how you can turn your strengths into new opportunities. Basically, this means doing more of what you are good at. In the example above, we highlighted landing page creation as a strength. You could turn this into an opportunity by creating more landing pages for your ad groups. Doing so could improve your quality score, decrease your bounce rate, and increase your conversion rate. Next, identify how you can turn your weaknesses into strengths. Again, in the example above, I listed a lack of a dedicated PPC account manager as a weakness. Assuming you have the budget to hire a new employee, this is a pretty easy one to fix. Alternatively, you could work with a digital marketing consultant. Now let’s look at opportunities. Is there any way you can capitalize on the opportunities you’ve identified? We listed e-commerce growth and new products as opportunities above. One option is to increase our budget to take advantage of the growth in e-commerce. Another would be to create new ads and landing pages for our new products. Finally, look at the threats. You probably won’t be able to change any of these directly, but you figure out ways to mitigate the threats. For instance, if you have a larger competitor with a bigger budget, you can maximize your ROI as much as possible or target longer tail keywords. Examples of SWOT Analysis for PPC CampaignsAre you ready to start your own SWOT analysis? Hopefully, you can use my examples as a jumping-off point. But just in case you need more guidance, here are a couple of other examples of SWOT analysis for PPC campaigns. The first is by White Shark Media. 
You can see they get very specific listing ad KPIs in both the strengths and weaknesses columns. They also do an excellent job of balancing strengths with weaknesses and opportunities with threats. The second is by SEMrush and Hanapin Marketing. 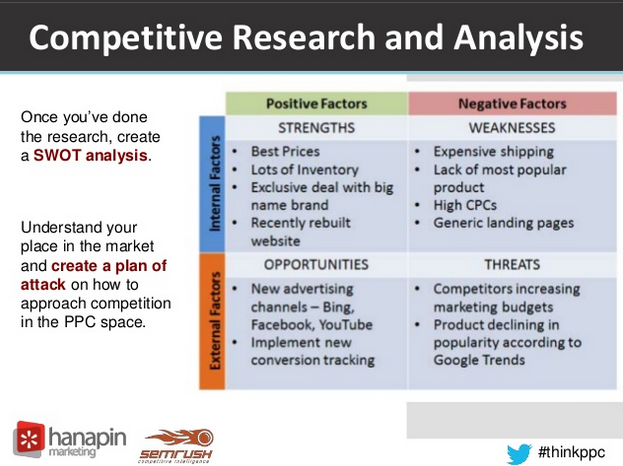
This is a much broader approach to PPC SWOT analysis, including things like product prices and availability. They also do a nice job of matching up strengths with weaknesses and opportunities with threats. ConclusionA SWOT analysis is a great way to get a different perspective on your PPC campaign. Remember, your campaigns don’t exist in a vacuum, and neither should your optimization efforts. By thinking about your ads in the context of the broader market and economy, you can optimize your campaigns at a level your competitors can only dream of. Why stop at creating new ad copy and running A/B tests when you can find out ways to capitalize on new consumer sentiment or shifts in the market. What have you uncovered with your SWOT analysis? Let me know in the comments! The post How to Do SWOT Analysis For PPC appeared first on Neil Patel. Original Entry: How to Do SWOT Analysis For PPC is shared from https://neilpatel.com/blog/swot-analysis-ppc/ via https://neilpatel.com Check out the original post, How to Do SWOT Analysis For PPC that is shared from https://putyourfamilyfirst.wordpress.com/2020/11/12/how-to-do-swot-analysis-for-ppc/ via https://putyourfamilyfirst.wordpress.com 
Every minute, 500 hours of videos are uploaded to YouTube. With that much competition, you might have counted yourself out and accepted that getting enough Youtube subscribers isn’t worth the effort. But what if you’re making a social media mistake? What if you could break through the noise and become popular on YouTube? One of the best ways of measuring popularity on YouTube is by looking at the number of subscribers. The more subscribers you have, the more you can consistently achieve high view counts on your videos. Not everyone who is uploading a video to YouTube has laid out a strategy that will allow them to increase subscriber numbers, which leads some to buy YouTube subscribers — which is a huge mistake. When you buy YouTube subscribers, many of those accounts are fake. Even if they are real people, they are unlikely to engage with your content and actually buy what you have to offer. In short, buying YouTube subscribers is a waste of time. Instead, work to build a strategy to boost subscriber numbers — then you can join the ranks of companies seeing massive success on YouTube and earn free YouTube subscribers. In this post, we’ll look at how you can grow your YouTube subscriber count. We’ll analyze a variety of media marketing strategies and show you how to implement them. By the end, you should have a good sense of how to create a strategy that will allow you to use YouTube to grow your business. Give Your Channel a Theme to Gain YouTube SubscribersBefore you do anything, you need to give your channel a theme. If you look at many of the top YouTube channels, you’ll notice that many of them stick to a theme. Take a look at the Derek Halpern‘s channel, for example. 
Notice how a lot of the YouTube videos he creates are on topics related to business and success. Having a theme makes it easier to create consistent YouTube content. On top of that, you can make your channel the ‘go-to’ place for specific content. This is the goal of a social media platform. If your channel caters to a specific niche, then people who care deeply about that niche will want to become subscribers. For example, imagine your videos are all about Facebook marketing, and you aim to help business owners. If a business owner who wants to learn more about Facebook marketing subscribes to your YouTube channel, they’ll get an update any time you post content. This helps them stay ahead of the curve without having to do a lot of work. If you’re struggling to come up with a theme for your channel, think about the problems your business solves and who it solves those problems for. Then, produce videos based on the topics you know will help the people your business serves. Post Incredible Content to Gain YouTube SubscribersMany marketers agree that video converts better than other forms of media. If you want to drive conversions, you need to learn how to create incredible content on your media platform. Plus, if you can create incredible content, then a lot of the work related to growing your subscriber count is already done. When people subscribe to your channel, they’re essentially signing up to get updates whenever a new piece of content is posted. If your content is great, people won’t mind hearing from you again because their initial interaction with you and your content was positive. Whether that’s a learning experience, an entertainment experience, or both — it’s worth watching your videos. And remember that people take the time to watch great content. According to Hubspot, 54% of people want to see more video content from marketers. This is a good foundation for your media platform that will expand social networks. If your content is excellent, then you’ll benefit from the fact that 54% of senior executives share content with their social networks. So how do you produce incredible content that makes viewers want to subscribe and share? Start by focusing on producing content that is relevant to your target audience. Provided that you’re sticking to a theme, as mentioned before, it shouldn’t be too hard to come up with a way to produce valuable content. Then, use these tips. Look for Popular Keywords on YouTubeLet’s say that you want to create a channel that covers the topic of ‘pencil drawing.’ One way to develop content ideas is by simply entering the broad keyword of ‘pencil drawing’ into the YouTube search engine. YouTube is the second-largest search engine globally, so we know there’s going to be some relevant data here. 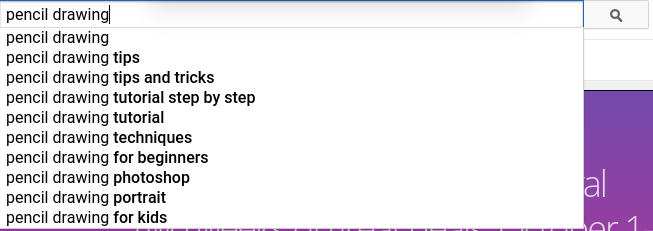
When we type in the keyword, we see the suggestions above. Now, those topics might seem a little broad, so you may want to pick one of those keywords and go through the same process again so that you can generate something more concise. Let’s add the word ‘tutorial,’ for instance. 
By adding the word tutorial, we are now provided with more concise keywords. The fact that these keywords appear in the suggestions lets us know that people are searching for these videos. You might argue that there is a lot of competition for such keywords. And while that may be true, later on in the post, we’ll figure out how we can get people to view our videos, even when there is a lot of competition — so don’t let it be a concern for now. The great thing about the approach above is that it gives us a place to start. If we want to produce content for a certain niche, this technique lets us know what kinds of content people will already have an interest in viewing. My tool Ubersuggest is another great YouTube keyword research tool. Simply type in your main key term and click “Keyword ideas” in the right sidebar, and it will deliver more than 400 keywords for you to consider. 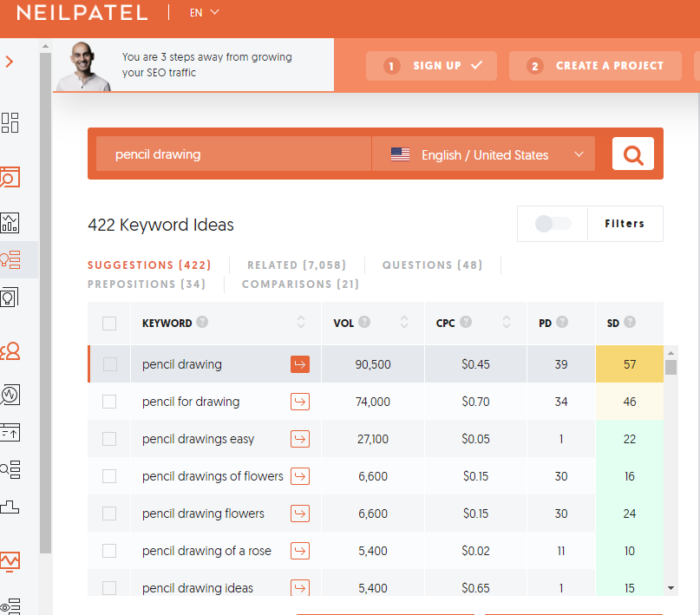
You can also use the Google Keyword Planner tool to come up with content ideas. That’s because there will be some coherence between Google search results and YouTube search results. Let’s stick with the topic of ‘pencil drawing.’ 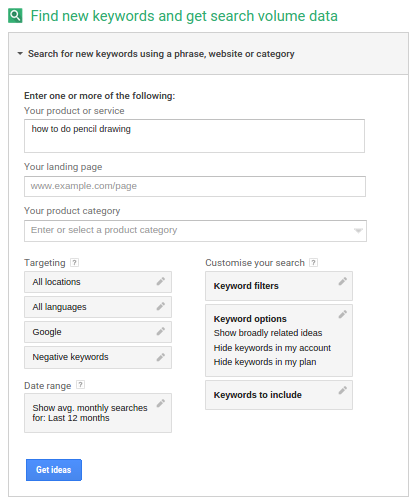
In the ‘Your product or service’ box, enter a keyword-based on your business. If I were running a business that taught people how to do a pencil drawing, I’d enter ‘how to do a pencil drawing.’ You want to keep the keyword broad at this stage because it’ll allow for the keyword tool to develop a wide range of ideas for you. 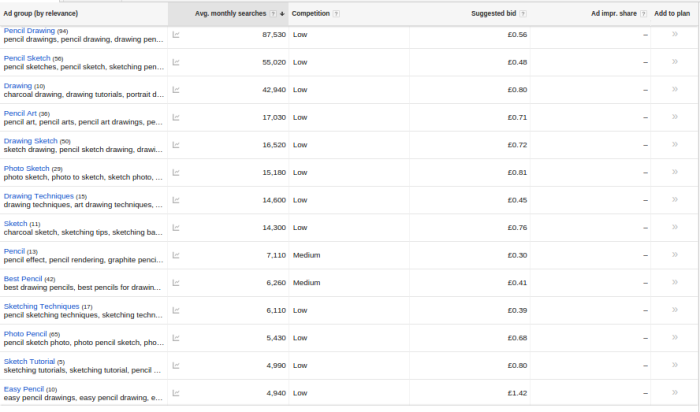
Once you’ve entered the keyword, you’ll then see this page. It shows several ‘Ad groups’ of keywords. Each group of keywords centers around a certain topic. As you can see, I’ve arranged the groups in terms of ‘Average monthly searches’ and descending order. This gives us a sense of where there might be a lot of competition. Let’s click on the mid-range group called ‘Drawing Techniques.’ 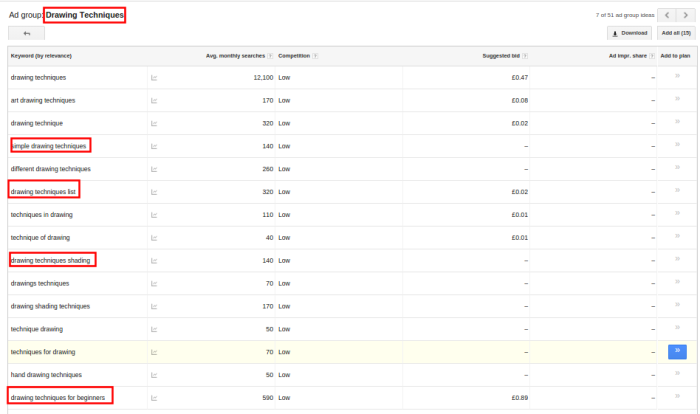
I’ve highlighted a few keywords that might represent good YouTube content opportunities. I chose these keywords because it’s clear to see how you could create a focused, high-value video centered around these keywords. You might think that these keywords don’t have that many searches and, therefore, aren’t worthy in terms of effort required. However, remember we’re not just going to post a handful of videos and then be done with it. Cultivating a YouTube channel so that it eventually has many subscribers often requires posting a lot of content. In fact, the biggest YouTube channel has over 4,200 videos. If you want to publish massive amounts of content while keeping it relevant, you need to be able to niche down your content as much as possible, so each video provides value. If you niche down, it’s only natural that the level of searches per month will go down. Even if you focus on low volume keywords, they’ll all come together to help you build momentum and establish yourself in a YouTube niche. You’ll also notice there isn’t a ton of content for those lower volume search terms, which represents an opportunity. Look at what happens when I type in the ‘Simple drawing techniques’ keyword. 
There’s a playlist there, but other than that, there aren’t any fully optimized titles or even videos based solely around the topic of ‘simple drawing techniques.’ Improve the Production Quality of Your YouTube VideosProduction quality shouldn’t be a top priority, but it can definitely increase the number of YouTube subscribers after a certain point. As long as your videos are rich in value and provide the viewer with the information they need, you’re doing a good job. When the videos start to bring you a return, then you can focus more on production quality. Here are a few tips. Ensure what you’re saying can be easily heard. You must speak clearly and enthusiastically. You’ve got to project your voice. Otherwise, people might not be able to understand what you’re saying. They might even get bored. You don’t need to act like an extrovert; just try and prevent your voice from becoming monotonous. If you’re recording your content using a phone or a laptop, the microphone might not be enough. So, you may want to invest in a quality external microphone. However, test it to see how things actually sound before you make this investment. You also need to ensure that your video is easy to watch. You don’t want to make it hard work for your viewers to see what is going on. This means you need to ensure lighting is adequate. If you’re recording a talking head style video where you’re talking to the camera, ensure that your face can be clearly seen. If someone is recording you, then ensure the camera isn’t shaking. If you’re recording your laptop screen, make sure your actions can be clearly seen and that anything you type can be read. Use Video Editing to Improve the Quality of Your YouTube VideosWhen it comes to video editing, you have a couple of solutions. When speaking about video editing, what we’re referring to is improving your videos’ style and not so much about removing minor mistakes. More often than not, you’re going to make minor mistakes when recording your video. You don’t need to put tons of focus into removing these bits, as they don’t harm your video all that much. In fact, they might even help your video as they let other people know that they’re dealing with a real person rather than a sly media marketing salesman. Where editing can come in handy, though, is when you need to create cuts in your video or add a title screen. If you’re not an accomplished video editor, you could seek someone from Upwork or perhaps even Fiverr. 
Alternatively, you could purchase a video editing suite and learn to do everything yourself. That method might save you a bit more money, though you might end up spending a lot more time learning how to edit videos on your own. This takes time away from your media marketing. That might not be the best trade-off, depending on your circumstances. As mentioned, you don’t want to over-edit your videos, though you want to give them a sense of style that separates you from the crowd. Often, the easiest way to do this is by having custom intro music and a custom title screen. Another way that you can post incredible content is by creating videos based on your product being used. Demonstration videos can go a long way in showcasing your product as something worth buying. You can even turn some of your blog posts into videos. Nearly 59% of executives would rather watch a video than read a chunk of text. Okay, so that’s the basics of creating incredible content. The next point will be essential if you want to ensure that your YouTube subscriber rates grow consistently over time. Get More YouTube Views by Posting Often and ConsistentlyThis is probably the hardest part of growing a YouTube following — though it can also be one of the most important. The average company posts 18 YouTube videos a month. Posting content consistently is a great way for you to compete. Plus, if you’re constantly posting new content, then people have a reason to become a subscriber and share it on their social networks. After all, people are less likely to subscribe if you’re not going to post any more content — why should they? If you use the tips mentioned earlier, then coming up with ideas for posting new content is pretty easy. You just need to set a schedule and stick to it. How Often Should You Post New YouTube Videos?If you want to keep things simple, look at what your competition is doing, and then one-up them. If they are posting twice a week, aim for three times a week. Sometimes, however, the best plan is the one you can stick to. Consistency in your media marketing campaign is important, as it’ll keep existing subscribers coming back for more. This will result in more YouTube views — and also improve engagement. Engagement on a video tends to come in the following forms:
Ideally, you want to improve the engagement levels in each of these categories through any social media site. People like to engage with content on YouTube — did you know that over 100 million people per week take a ‘social action’ on YouTube every week? Another mind-blowing fact is that 700 videos are shared every minute on Twitter. So while YouTube is not a social media site, it is a valuable tool for any social media marketing platform. Great engagement will help make the video more visible in the YouTube search engine. This will expose your video to more people, who can then become subscribers themselves. If you want to view some statistics in terms of how your videos perform, you can use the YouTube analytics dashboard. 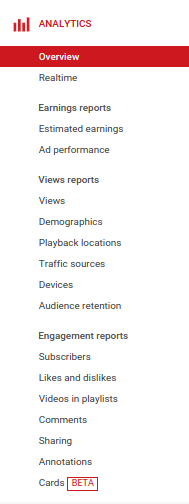
You don’t have to be at a computer to post content consistently. That’s because you can use the scheduling feature provided by Google. To gain access to this feature, you must first turn on monetization for your videos. This means that you are willing to show ads on your videos. If you don’t want to show ads on your videos, don’t worry. You still have control over which videos are monetized and which ones aren’t. Let’s take a look at how you can get that done.
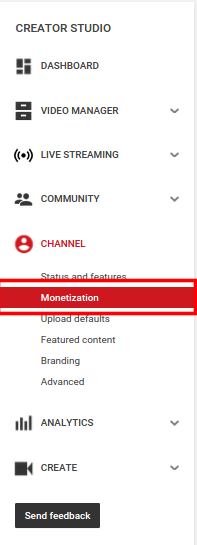
Now, you’ll be able to access the scheduling features provided by YouTube to program your media platform. You’ll also be able to access a lot more in the way of YouTube analytics. If you want to schedule a video, click on the ‘Upload’ button. 
Then click on the dropdown menu and select the ‘Scheduled’ option. 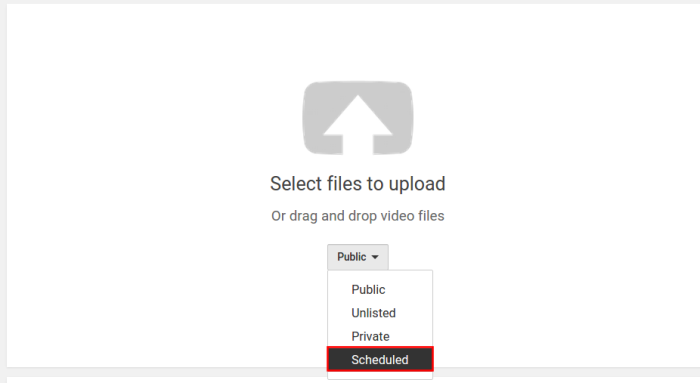
Then drag and drop your video, or click the icon to upload it. On the next screen, you can adjust the scheduling options. 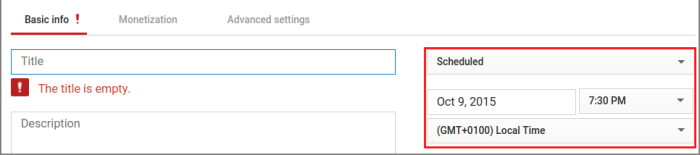
Now enter the date and time you want the video to go live. If people are subscribed to your channel, they’ll get a message when your video goes live. Make sure to schedule that date into your social media management platform, if you have one. This will ensure that Tweets, Facebook updates, and LinkedIn posts are sent out simultaneously. If you have an email list relevant to your video, you might even want to send a message out to those folks. Consider staggering the messages, so you’re not bombarding people on multiple platforms all at once. Consider Turning Long Videos into Multiple Short VideosIf you’re struggling to develop content ideas daily, consider splitting up longer videos into several shorter ones. In long videos, you likely cover several points about one main topic. You could edit out certain topics and then create mini videos using those topics. Shorter videos are more convenient for social network sharing. In fact, Hubspot found that 2 minutes is the optimal video length on YouTube for their audience. You’ll notice that the channel ‘Inside Quest’ does this a lot. Here’s one of the videos on their channel. Note how it is nearly 49 minutes long: 
For someone new to the channel, that video length can be pretty intimidating. So, they have broken down the video into some ‘highlight clips,’ covering interesting points and topics. 
Note how short each of these videos is — just around a minute. Short videos can be a great way to introduce people to your channel by giving them a taste of your content and building your media marketing campaign. Create Evergreen YouTube VideosA great way to consistently generate subscribers is by creating evergreen content. These are videos that will relevant whether they are viewed today or five years in the future. This will apply to some niches more than others. For example, I spoke earlier about the pencil drawing business, which naturally lends itself to producing a lot of evergreen content. A video about Instagram marketing, however, might be out of date in five years. Take a look at your niche and see if you can create ‘how-to’ videos that will stand the test of time. Even if you’re not looking to create evergreen content, it’s worth creating ‘how-to’ videos to provide value. Optimize Your Videos to Increase YouTube SubscribersBefore anyone can become a subscriber to your channel, they need to first click on your videos. No matter how good your video is, once it is seen in the YouTube search engine or sidebar, it will have some competition in the form of other videos. So how do you get people to pay attention to and click on your video? You need to focus on three areas — the headline, the thumbnail, and the description. These three elements will have the biggest impact on influencing YouTube users to click on your videos. Be sure the meta tag is relevant and includes key points. This is because they’ll help your rankings in the YouTube search engine. They’ll also improve your videos’ ability to entice users to click on them and share them on social media. YouTube categories and cards can also drive clicks, so we’ll cover those too. How to Create a Good Headline for YouTube VideosIf your video is based on a certain keyword, then the video’s title must include this keyword. When you do this, you increase the chances of someone clicking on your video. If the video’s title matches what they were searching for, they’ll assume that the video covers everything that they need to know about that topic. Of course, that doesn’t mean that you should be ridiculous in how you’re creating your titles. ‘Keyword stuffing’ can hurt you much more than it can help you. One way you can get around this problem is by using a colon. For instance, earlier, we identified the keyword — ‘simple drawing techniques.’ If we had a video on that topic, we could write the headline like this — ‘Simple drawing techniques: 5 tips that will make drawing easier.’ Side note: An interesting experiment might be to split the ‘simple drawing techniques’ title into separate niches. This is a common social media marketing technique for blogs and helps videos too. For example, ‘simple drawing techniques for cars’ or ‘simple drawing techniques for eyes.’ This is a great example of how you can take a big niche or keyword that is receiving a lot of traffic and identify opportunities within that niche. As I mentioned, you’ll have to experiment a little when you do things this way. But, there’s no telling what kind of opportunities you might uncover. 
As you can see in the example above, the video title uses a colon to separate the text. You’ll also notice that there are videos where the ‘|’ symbol is being used. 
You’ll have to test which one works better, though it could just be that this symbol serves a similar purpose to what the colon would have done. When it comes to creating YouTube headlines, you’ll want to follow the rules that already exist for blog posts. You need to have a mix of something that people are searching for and something that grabs their attention. This is core media marketing that can lead to social network inclusion. You can do that by using the keyword your video targets in the headline and then including power words in the gaps. As we’ve discussed, the style of your videos is going to influence the headline. If you have a ‘how-to’ video, then you’ll need to account for that in your headline. Similar to blog post headlines, numbers also tend to work well in YouTube headlines. Use Engaging YouTube ThumbnailsWhen it comes to the thumbnail, there are a couple of approaches that you could take. The first is to show a clear image of whatever the video is about. For example, if you’re talking about a laptop, you’d want to include a picture of a laptop. Like this: 
Alternatively, you could just show a picture of a person interacting with whatever the video is about. Like this example: 
However, one of the increasingly powerful ways of creating video thumbnails is by adding text, like this: 
Don’t just drop some text and call it good. You can also heavily edit the thumbnail image so that it clearly stands out. 
Here’s another one: 
If you want to create thumbnails like this, you need to follow these rules. 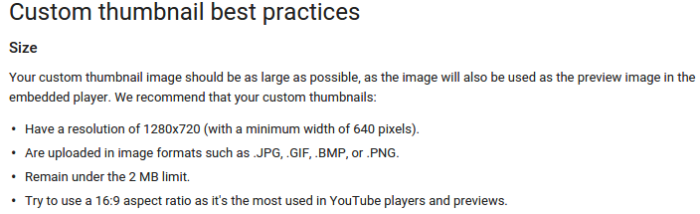
How to Create a Custom Thumbnail for YouTube VideosYou can create a thumbnail using Canva. If you want to learn more about using Canva, going through their initial setup process might be helpful. They have a YouTube thumbnail template, so use that to get started. 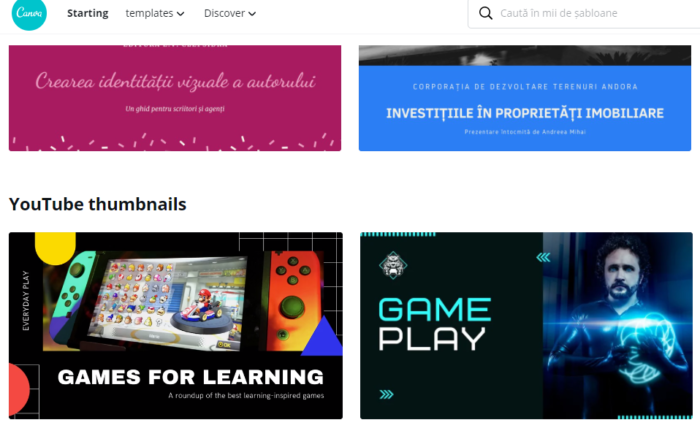
If you have some images of your own, you can upload them and then overlay text onto them. I’ve just gone with the option of creating a basic thumbnail from scratch. Obviously, you can create something much better than this. 
If you want to upload a custom thumbnail for a video, just go through the normal upload process. On the page where you can adjust the video information, pick the ‘Custom thumbnail’ option. 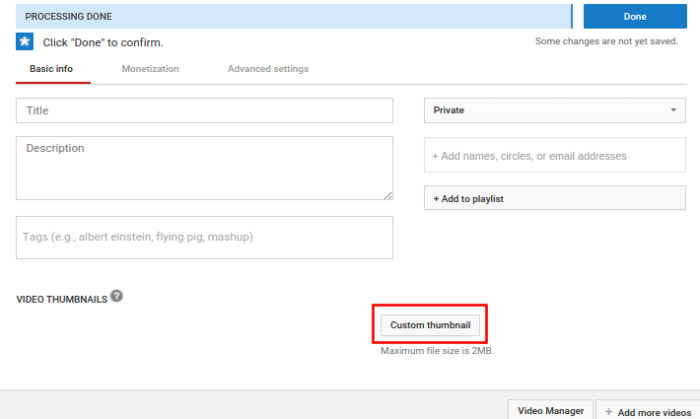
You’ll then have a custom thumbnail that will be shown around the YouTube platform. Create Better YouTube DescriptionsCreating a description for your YouTube videos could become an entire post in itself. We’re going to cover the basics here. You need to keep in mind that you have a lot of space here, and YouTube tends to use what you say to rank your content. Don’t ignore the meta tag and its importance. The first couple of lines on your description should be written so that they are easy to read in the search results. Here’s a great example. 
In this section, you may want to use some of the keywords you used in your title. That way, you can ensure that it has some coherence. This will also improve the ranking ability of your video. When people click on your video, they have the option to click on the ‘Show More’ text. 
This will expand the description. You can use this space to insert a ‘subscribe to channel’ link. If you want to do that, use the following link format -- Make sure that you enter your channel name after the ‘=.’ So, for Kissmetrics, it would be -- When people click on this link, they’ll be taken to your channel page, where a subscribe box will pop-up. You can also enter some other information, such as your other social media profiles, important links, and even your content posting schedule in the description. 
You can also describe the things that are being discussed in your video, like this -- 
You could even highlight what is discussed at certain time sections in your video like this: 21:48 – How to prevent your website from being penalized by Google. These timestamps will actually take those who click on them directly to the specified location in the video. Add Tags to Increase YouTube ViewsIt’s also important to add tags. This will help improve the chances of your video appearing in the YouTube search engine. 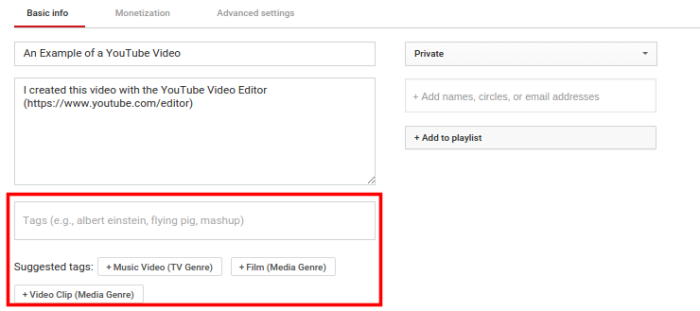
You don’t want to use anything that is misleading here. Have a mix of some really specific tags that describe your video. Then, add a few broad tags that are still related to the genre. There’s no harm in using some of the suggested tags provided by YouTube, as long as they align with what your video is actually about. Use YouTube CardsYouTube Annotations used to be the best way to engage users by directly adding links and other content to your video. However, annotations were disruptive and were discontinued and then deleted in 2019. Today, you have the option of using YouTube cards. You can add up to five cards to your video with a customized image, text, and call to action. Here’s how you would go about creating a ‘YouTube card’ for your video. Select the ‘Video’ option inside of the ‘Video Manager.’ Then click on the ‘Edit’ drop-down menu for the video you want to add a card to. Then select the ‘Cards’ option. 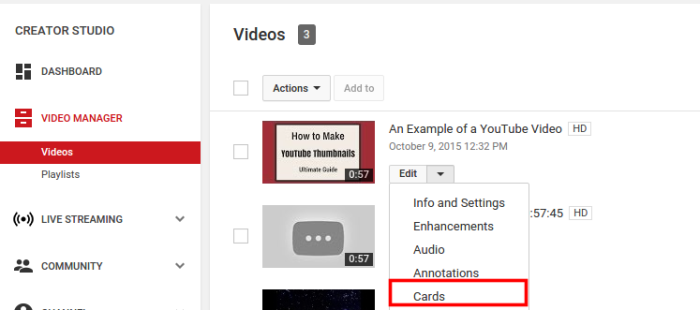
You should then see this screen. 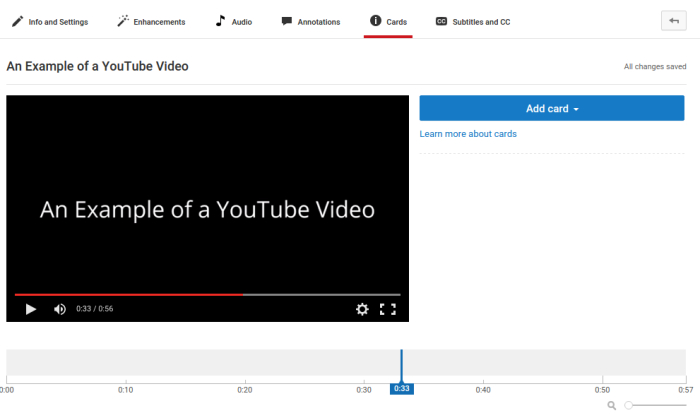
Click on the ‘Add card’ option and then choose the ‘Channel.’ 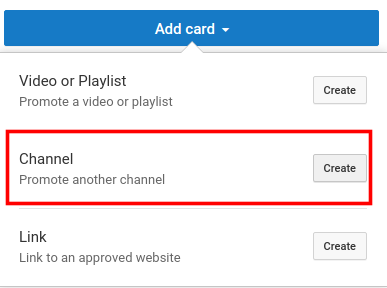
Then, enter your channel name and add text. 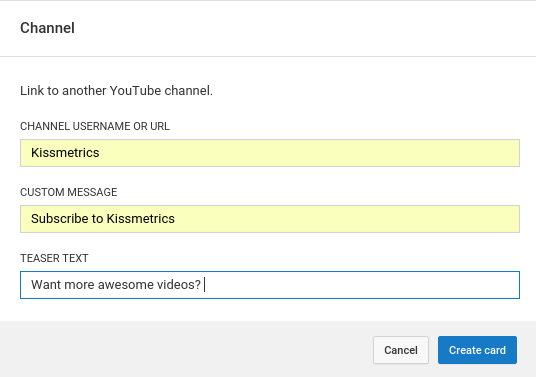
The teaser text is the text that appears on the little graphic that appears in the video. Here is how it will look: 
If you want to adjust when the card displays the ‘teaser text,’ adjust the slider below. 
You’ll notice, however, that the ‘i’ will always be visible in the video. If people hover their mouse cursor over the ‘i,’ they’ll see the following. 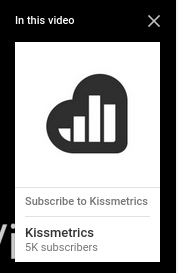
This card will also appear at the time that you have chosen above. Clicking on this will take users straight to your YouTube channel. However, no subscriber box will pop-up. Engage Your YouTube AudienceAnother way to boost your YouTube subscriber numbers is by engaging with your audience and creating a community. There are several ways that you can do this. Respond to YouTube Viewer CommentsResponding to comments is a simple — but effective — way to engage users. This will show YouTube viewers that you value their opinion. Plus, the fact that you’re going through this effort might encourage them to subscribe. You could even argue that this counts as customer service work that improves the customer experience. When you look at it through that lens, you use the fact that 22% of people post positive things on social networks about a company after having previously posting something negative — all because they got a response. If you’re getting any negative comments on your YouTube videos, address them promptly. This can increase YouTube subscribers because people see this interaction and appreciate the fact that you engage. Host a Q&A SessionYou can do this using Google Hangouts on Air or YouTube Live. You might even just ask at the end of a video for viewers to post their questions in the comments section. Then, in the next video, you could spend some time going through the questions you received. Ask Viewers What They WantAnother way to engage your audience is by creating videos based on what they want. For example, you could use a survey to ask your audience what they want to see you talk about. You can then create a video based on a viewer’s suggestions and call them out in the video to say thank you. Consider Collaborating With Other YouTube Video CreatorsWhen it comes to boosting subscriber numbers, you also have the option of doing collaborations with people in your industry. Collaborations can massively boost your video marketing efforts. 
If you go about things in the right way, you may just end up joining the 18% of companies that regard their video marketing as ‘very successful.’ The best way to go about this is to find channels with a similar audience. Both of you could then arrange an event where you can both benefit from the interaction. When you collaborate, you must encourage people to subscribe to your channel. Also, make sure the videos you publish immediately after the collaboration are amazing, so they want to subscribe. Host Interviews to Increase YouTube SubscribersAlternatively, consider doing interviews on your channel. If you can find a way to interview the top people in your niche, you’ll be able to attract their audience to your channel. When your channel has a decent number of subscribers, you’ll have a greater ability to attract these opportunities. Of course, you shouldn’t let low subscribers be an impediment that stops you from trying. Email a few people who might be worth having on your channel and ask them if they’d be willing to be a guest. If they say no, respectfully ask if they’d be willing to do a show when your channel has more subscribers. See if they can provide you with a ballpark figure that they’d be happy with. You don’t want to be rude, but there’s nothing wrong with asking for a potential future way to make it happen. Consider YouTube AdsI’ve already spoken extensively about using YouTube Ads. To get the most out of ads, target keywords your videos are created around. This will ensure that your videos appear at the top of the search results when people enter that keyword. 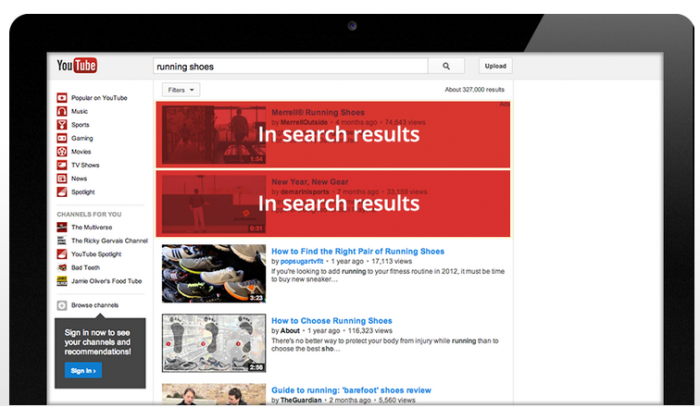
If you are just getting started, you might want to get a feel for the platform first. But, if you’ve got a solid YouTube monetization plan, ads can be an effective way to drive subscribers and YouTube views. ConclusionIgnoring the potential on YouTube is a huge mistake. One of the keys to consistent success on YouTube is increasing your subscriber count — but don’t fall victim to those buy YouTube subscribers scams. Instead, work to create exceptional content that will keep your audience coming back for more. Then, make people want to click on your content using brilliant thumbnails and killer headlines that draw them in. When people finally click on your video, then you can ask for a subscription. Once you’ve got those fundamentals down, you’re free to experiment with things like collaborations and YouTube Ads. If you put enough effort in, you’ll see those subscriber numbers start climbing — which can lead to website clicks and more. All you need to do is get started! What have you found to be useful when it comes to boosting subscriber numbers on YouTube? The post How to Double Your YouTube Subscribers (Without Buying Them) appeared first on Neil Patel. Original Entry: How to Double Your YouTube Subscribers (Without Buying Them) is shared from https://neilpatel.com/blog/the-real-secret-to-growing-your-youtube-subscribers/ via https://neilpatel.com Check out the original post, How to Double Your YouTube Subscribers (Without Buying Them) that is shared from https://putyourfamilyfirst.wordpress.com/2020/11/11/how-to-double-your-youtube-subscribers-without-buying-them/ via https://putyourfamilyfirst.wordpress.com In college, I interned at a MarTech company that sold email marketing optimization software. With their software, brands could finally gain visibility into their email program’s deliverability rate or inbox placement, which most email service providers, like Constant Contact or MailChimp, can’t do. The business’ largest revenue stream was a channel partner program that enabled email service providers to sell my old company’s software to their own customers. And one day, at an all-hands meeting, our CEO showed us a slide that listed every single email service provider we partnered with and the amount of customers they all had. He told us this was our total addressable market. Then, he showed us a slide of how much of the market we had captured — it was a single digit percentage. Even though we generated $100 million in revenue per year, we were shocked at how little of the market we had secured. But it also helped us realize that we still had plenty of room to grow, which motivated us to win as much of the market as possible. Whether you want to start a new company and gauge its industry’s profit potential or forecast a realistic revenue growth goal for your business, measuring your total addressable market is a crucial first step you must take. To help you do this, we’ve put together a guide that’ll teach you exactly what total addressable market is and the best way to calculate it. Total Addressable Market (TAM)Total addressable market or TAM refers to the total market demand for a product or service. It’s the most amount of revenue a business can possibly generate by selling their product or service in a specific market. Unless they’re a monopoly, most companies can’t capture the total addressable market for their product or service. Even if a company just has one competitor, it would still be extremely difficult for them to convince an entire market to only buy their product or service. That’s why most companies also measure their serviceable available market to determine how many customers they can realistically reach with their marketing and sales channels. Additionally, they gauge their share of market to understand the size of their actual target market. However, total addressable market is still useful because businesses can use TAM to objectively estimate a specific market’s potential for growth. How to Calculate TAMThere are three ways to calculate your business’ total addressable market. 1. Top-DownThe top-down approach uses industry data, market reports, and research studies to identify the TAM. In this approach, you might use industry data from Gartner or Forrester to identify which subsections of your industry align with your goals and offering — and just how big those subsections are. However, there are limitations here. Data generated by industry groups may not always be kept up to date and may not reflect niche elements of your market. You may want to hire a market research consulting firm to conduct fresh research that is focused on your need areas. 2. Bottom-UpThe bottom-up approach to TAM calculation is based on previous sales and pricing data. First, multiply your average sales price by your number of current customers. This will yield your annual contract value. Then, multiply your ACV by the total number of customers. This will yield your total addressable market. Let’s see what this looks like in an example.
Say you sell scuba fins to dive shops in the state of California. You might sell an average of 60 pairs of fins, at $35/pair, to dive shops in California. 60 multiplied by $35 equals an ACV of $2,100. Then, you’d multiply your ACV ($2,100) by the total number of dive shops in California (125) for a total addressable market of $262,500. 3. Value-TheoryThe value-theory approach is based on how much value consumers receive from your product/service and how much they’re willing to pay in the future for that product/service. To return to our scuba example, let’s say you manufacture a type of fin that’s lighter than your competitors and has patented technology that makes them easier to get off than anything else in the market. You’d identify your value-theory by estimating how much dive shops would be willing to pay to carry your superior product. If normal fins are being sold at $35 a pair, would dive shops pay $40 or even $45 for a pair of your ultra-lightweight fins? After you calculate your total addressable market, it’s time to determine whether it’s worth entering the industry or not. An industry with a market size ranging from $30 million to $200 million per year might be worth entering. However, if the industry’s market size is under $5 million per year or over $1 billion per year, it’s probably not. In both situations, it’d be challenging to persuade investors to back your company — an industry with a market size of $5 million per year would likely be too niche and an industry with a market size over $1 billion would likely be too saturated. Know Your TAM Before You Take ActionStarting a business or projecting next year’s revenue growth is always thrilling. But if you want to follow a realistic path toward success, you need to first understand what’s actually possible. So let your total addressable market be your North Star and guide you through a journey that’s rooted in reality, not hype.
Original Entry: Total Addressable Market (TAM): What It Is & How You Can Calculate It is shared from https://blog.hubspot.com/marketing/total-addressable-market via https://blog.hubspot.com/marketing Check out the original post, Total Addressable Market (TAM): What It Is & How You Can Calculate It that is shared from https://putyourfamilyfirst.wordpress.com/2020/11/11/total-addressable-market-tam-what-it-is-how-you-can-calculate-it/ via https://putyourfamilyfirst.wordpress.com As you browse and maneuver around the internet, you visit landing pages all the time. A landing page can be the designated page you’re taken to when you click on an ad. It can also be the page that follows a call-to-action button or serve as the homepage of a website. Regardless of how you “land” on a landing page, its purpose is to encourage you to convert to a lead or customer. For that reason, landing pages are uniquely powerful components of a business’s digital marketing strategy. What is a landing page?A landing page is a website page with a specific purpose — the objective of a landing page is to convert visitors into leads. While there are many types of landing pages the intent the same — get more leads. Landing pages contain lead forms that ask visitors for their contact information in exchange for something of value, otherwise known as an offer. The video below will help drive that definition home. Now, think about how protective you are of your personal information. What would make a person want to give up their contact information over the internet? Well, that’s where landing page best practices come in. A targeted, well-crafted landing page with a solid format and sound copy will get almost anyone to submit their information. First, why do you need a landing page?Why would you create a special page just for people to fill out a form? Why not just use your homepage or about page? Great questions. After reading this article, you’ll likely be able to answer those questions yourself, but the short answer is this: A landing page eliminates distractions by removing navigation, competing links, and alternate options so you capture your visitor’s undivided attention. And complete attention means you can guide your visitor where you’d like them to go, i.e., to your lead form. In sum, landing pages are specifically designed to create conversions. Now that you understand their importance, let’s cover landing page best practices to make sure your pages are set up to convert. Was that a lot? We’ll break down these landing page best practices below. 1. Craft a benefit-focused headline.For every 10 people that visit your landing page, at least seven of them will bounce off the page. To keep that number low, your visitors need to know (and understand) what’s in it for them within seconds of arriving. Your headline is the first thing they’ll read, and it should clearly and concisely communicate the value of your landing page and offer. 2. Choose an image that illustrates the offer.Yes, an image is mandatory, and it should represent your target audience. The purpose of your image is to convey a feeling — it should illustrate how your visitor will feel once they receive your offer. Certain images may work better than others, so you should always split test your options (which we’ll cover below). 3. Write compelling copy.Don’t spend all that time crafting the perfect headline and finding your ideal image to fall flat when it comes to the words that will actually sell your call-to-action. Your copy needs to be clear, concise and should guide your visitor to the action you want them to complete. Compelling copy also speaks directly to the visitor by using “you” and “your” to make them feel engaged. We’ll go more in-depth on copy tips below. 4. Include the lead form above the fold.Your lead form needs to be readily accessible should your prospect want to convert right away — you definitely don’t want them searching and scanning your landing page to find your offer. “Above the fold” just means that visitors don’t have to scroll to get to the form — that it’s in view as soon as someone hits the page. This could be a form or an anchor link to the form. Even better: Design your form to scroll with the user as they move down the page. 5. Add a clear and standout call-to-action.The call-to-action (CTA) is arguably the most important element on your landing page — it’s one of many elements that encourage conversion. The CTA button needs to stand out, meaning you should use a color that contrasts with other elements on the page. Be clear about what you want visitors to do, that is, use an action verb that spells it out for them, like “submit”, “download”, or “get it now”. More on CTA best practices below. 6. Give away a relevant offer.Think of your landing page as a part of your lead’s journey to your ultimate offer — your product or service, that is. Your offer is the thing you give in exchange for your lead’s personal information. Not only should it be compelling enough for your visitor to provide their contact info, but it should also be relevant to your business. Say you sell horseshoes. Your offer might be something like “10 Simple Ways to Size Your Horse’s Hooves,” because, ultimately, you’re going to ask that lead to buy your horseshoes. You wouldn’t hook them with an offer about organic farming because that puts them on a completely different path. We’ll talk more about how compelling offers below. 7. Only ask for what you need.You want to gather as much information as possible about your lead, but how much you ask for depends on several factors: how well acquainted they are with you, where they are in their buyer’s journey, and how much they trust you. Ask for as little info as you need in your lead form to create a low barrier to entry. A name and an email are more than sufficient to nurture a new lead. 8. Remove all navigation.Your landing page has one objective and one objective only: to convert visitors into leads. Any competing links — including internal links to other pages on your website — will distract from that goal. Remove any other links on your page to draw all of your visitors’ attention to your call-to-action. 9. Make your page responsive.Just like every other page on your website, your landing pages need to be responsive to accommodate every viewing experience. The last thing you need is for your form to fall out of view on mobile devices. Give your visitors every possible opportunity to convert, no matter how they’re viewing your page. You can use tools to help accomplish this. For example, HubSpot’s drag-and-drop landing page editor, available in Marketing Hub Starter, makes it easy for you to create mobile optimized landing pages and forms effortlessly. 10. Optimize for search.Sure, you’ll be driving visitors to your landing page through email blasts, social posts and other marketing methods, but your page should also be optimized with target keywords for your paid campaigns and organic search. When someone searches for your key phrase, they should find your landing page. Similarly, when you target a keyword with paid ads, those words should exist on your landing page. 11. Remember to use a thank you page.A thank you page is where you send leads once they’ve completed your form. Now, you could just show a thank you message on the same page or ditch the thank you altogether, but there are many reasons why that’s not the best option. A thank you page serves three important purposes:
How to Design Your Landing PageOften times, design means creativity, colors, and pretty pictures. For the purpose of a landing page, we take design a step further to mean functional, direction-oriented, and effective. So, to craft a well-designed landing page, you’ll have to tap into both your right and left brain. But don’t get me wrong — you still need great imagery and attractive colors to convert your visitors. We’ll touch on how to incorporate all of this below. Landing Page StructureThe good news is you don’t need to get too creative here. Most landing pages follow a very similar structure because it’s been proven to work. You can infuse your creativity through branded elements and images, but stick to a landing page format that people are used to seeing. A good landing page has five elements (check out the landing page example below to see these elements in practice):
Can your landing page include more than this? Absolutely. (Think social share buttons that visitors can use to spread the word about your offer). This is simply the bare minimum. You need to know your audience, where they are coming from and where they are in their buyer’s journey to know how much you need to include. The rule of thumb is to include as much information as you need to get people to convert. Landing Page LayoutThis may come as a surprise, but most people don’t read every word of your cleverly-crafted copy. Instead, they skim through and pull out the most important tidbits. Your job is to make those tidbits stand out so your visitor doesn’t miss anything important. That means a few things …
Landing Page ColorsThe design of your landing page — including the colors you use — should reflect that of your website. You’re aiming to form a long-term relationship with the people who visit your landing page, and that means they need to become familiar with your branding colors and unique style. The more they recognize your brand, the more they trust you (and the more they trust you, the easier it is to get them to do what you want them to do). The areas where you should consider using alternate colors are on the elements of your page that need to stand out — ahem, your CTA button. Contrast is the name of the game here. Say your branded colors are mostly green … you’ll want to choose a color that can draw users attention, say purple. Wondering what colors perform well? We did a little research for you to determine which colors convert best. Landing Page ImagesThe image on your landing page is one the first things people see, and since people process visuals far quicker than they do text, it sets the tone for their entire experience. But how can you possibly choose between millions of stock photos and that company photo shoot that’s taking up all the space on your computer? Let’s narrow down the selection with a few important questions: Who is my target audience?What does your persona look like? How old are they? How do they dress? What are they interested in? The answers to these questions are important in determining what image you’re going to place front and center on your landing page. If it’s going to appeal to your audience, then it needs to represent them in some way. Where on my landing page do I want them to look?This might seem like an odd question, but really it’s based on the idea that people follow directional cues, like where someone is looking or pointing. If you want visitors to fill out a form, consider an image that drives their attention toward that form. Will this image reinforce my message?Every element on your landing page serves an important purpose. Since your image is one of the first things that people see, it should help clarify what the visitor can expect from your page. Make sure that your image adds value. Here are some other important things to consider when creating great landing page images. Call-to-Action (CTA)We’ve discussed your CTA a few times so far, but since it’s the most important part of your landing page, it’s worth mentioning again. When it comes to the design of your CTA, there are a few tricks will make it so alluring that visitors feel compelled to click. To clarify, your CTA includes the button and the copy you use to draw attention to it; these tips cover both.
Mobile Landing PageMore than half of website traffic comes from mobile devices, therefore, the user experience should be the same no matter the device visitors are using. By making your landing page responsive, you give them every opportunity to view and convert, whether they’re on a desktop, phone, tablet, or otherwise. Landing Page Copywriting TipsAfter design comes great copy. Your objective is to be compelling, instructive, likable, concise, effective, trustworthy and informative all at once. How? Keep reading. 1. Cover the main points.No matter how you position it, there are a few main points that you need to hit with your copy. Those main points are your persona’s pain point, the solution to that pain point, how your solution works (features), how your solution will improve their situation (benefits), and verification that it works (social proof). The majority of what you write needs to address how you can help your prospect, not how awesome you are (because that’s implied). Let’s go more in-depth on these points. The Pain PointThe pain point that you focus on should be the one that your offer solves. Not to sound negative, but it’s important to touch on the problem your persona is facing so they know you understand what they’re going through. Empathy is an effective way to build trust. And if they know you get their problem, then they’re more likely to trust your solution. Your SolutionThe solution to their pain point is what you’re offering in exchange for their information. Illustrate a clear path between their problem and how your solution is the remedy they need. FeaturesJust knowing what your solution is may not be enough to convert leads, so you need to mention what’s included in that solution. If it’s an ebook, what are the subjects your cover? If you’re promoting a webinar, how will it work and what will you teach? If it’s a service, what can they expect? Give your potential lead all the information they need to make a decision. BenefitsYour copy should be heavy with benefits to the user because that’s what they really care about — what’s in it for them. While features list what your offer has, benefits tell visitors how their situation will be improved as a result. It paints a vivid picture of how much better their life could be by using your solution. Social ProofStudies show that social proof is effective for persuading people to take a desired action. Social proof comes in the form of logos of brands you’ve worked with, testimonials from previous clients, reviews of your product, or confirmation that others have purchased your service. In essence, people want to know that others are have used and benefited from your solution, too. By including social proof on your landing page, you’re validating your offer without even saying anything.
Touching on each of these points will provide you with well-rounded copy that answers all of your visitors’ questions … which brings me to my next point. 2. Preemptively respond to objections.A key part of writing persuasive copy (copy that gets people to convert) is dismantling objections before they even come up. Now, this takes some skill … or at least some help from a friend. Once you’ve laid your foundation by addressing all the main points, put yourself in the mind of your prospect and think about where they might protest or challenge you as they read. For instance, if you say “We’ve helped Fortune 500 companies bring in customers,” your reader might scoff or doubt it unless you follow up that statement with social proof. Do this exercise for every section of your page (or ask an unbiased friend to help) until you’ve covered every possible objection you can think of. When you get questions from people who’ve visited your landing page, use that as feedback to sharpen your copy even further. Better yet, seek out constructive criticism from your first few converted leads to ensure your landing page is meeting every need. 3. Build trust with your prospect.Say you were reading a sales page and the company wrote, “Our product has helped 100 people and it might work for you, too!” Meh. I’d probably pass and find a company that has a solution that can definitely work for me. Your goal is to build trust with your visitor and the way to do that is to come across as an authority. Besides using social proof, some other ways to build trust are:
4. Use click triggers.Click triggers are designed to eliminate that last bit of doubt before a visitor converts. You can think of them as lick Probability Enhancers (… yes, I made up that term). They are essentially copy positioned next to your CTA that pushes your prospect over the edge by easing their mind and mitigating the risk of converting. Below are some effective ways to employ click triggers:
Whatever you choose, click triggers will give your conversions the boost they need. A/B Testing Your Landing PageEverything we’ve discussed until this point is great … in theory. But your business is different from others, and your target audience is unique. How do you know if the copy you chose is working? Or if your CTA placement is right? Or what colors perform best? Or which image to choose? You test it. That’s how. Split testing (or A/B testing) is probably nothing new to you as a marketer, and split testing your landing page is just one more experiment to add to your list. Let’s briefly go over how to best A/B test your landing pages. What is A/B testing?A/B testing is simply splitting your traffic to two (or more) variations of a page to see which performs better. While you could do this manually by launching one variation for a period of time, then another for the same amount of time, it’s far more efficient to use a software that allows you to split test and can track your results. The main components of an A/B test are variants, or the two versions of the page, the champion, or the original page, and the challenger, or the page that you modified to test against the original. How to A/B TestThe most important trick to split testing is to make very small tweaks with each experiment. For instance, you don’t want to split test your headline and your image at the same time because you won’t know which element garnered the results. For this reason, stick to testing one element at a time. The “winner” becomes your champion, then you can create a new challenger to test the next element. You repeat this cycle until you reach a conversion rate that you’re happy with (and that falls within realistic expectations, which we’ll cover below). What should you test?You can test virtually anything on your landing page. But while that’s possible, you may want to limit your test to a few of the most impactful elements of your page, like:
These tests will have the biggest impact on your conversion rates. Try starting with the simplest change first, like a headline or CTA color, then work your way to the larger undertakings, like your page copy. Landing Page Metrics to TrackMetrics will tell you everything you need to know about how well your landing page is performing as well as give you some insight on how to improve it. It’s hard to know exactly what will work when you launch a page. Measure and track meticulously in the beginning until you reach a relatively good conversion rate, then you can track your metrics less frequently. Page VisitsHow many visits are you getting on your landing page? The more visits, the more you increase your probability of conversions. Try adjusting your paid strategy or redefining your keywords to drive more traffic to your page. You can also let your current followers know about your offer through emails, social media, and on your website. Traffic SourceKnowing where your traffic is coming from will let you know where you should double down on or ditch your efforts. Submission RateThis is the number of people that complete your lead form and land on your thank you page. There are many tweaks you can make to your page to increase this number, but make sure to A/B test so you know what’s working. ContactsContacts refer to the number of leads that you generated from your form. The reason this is different from submissions is because duplicate contacts are only counted once, meaning if a current lead fills out your form to get your offer, they don’t affect the count. Heat MappingThis is more of an observation of how people interact with your page as opposed to a metric. Heat mapping can show you where people scroll, what they read, and how they engage with your page. This is all useful data when thinking about your page layout and structure. Bounce RateIf visitors are coming to your page and immediately leaving, then you need to examine whether the content is aligned with the offer. Does your copy capture visitors’ attention and do visitors automatically know what to do when they land on your page? Is your page a reflection of the copy you used to get people to visit it? Form AbandonmentThis metric tells you how many people start filling out your form but don’t complete it. If this number is particularly high, some adjustments to consider are introducing new click triggers, shortening your form, or making it more clear what you want your visitor to do. BenchmarksYou need to judge your landing page against industry norms and across a similar audience to know if it’s performing as expected. Check out some industry benchmarks to set as your baseline, but don’t be discouraged by other company’s results. No matter what’s going on, it’s possible to diagnose and heal your landing pages if you pay attention to the metrics. How to Make Your Landing Pages More EffectiveThere are always tweaks you can make to boost landing page performance. Below are a few great tips (if I do say so myself) to get your landing pages leveled up. Optimize your landing page.Optimize is such a confusing word, isn’t it? I mean, are we talking about imagery, copy, keywords, or UI? The answer is yes — we’re talking about all of it. Optimize just means to make your landing page the best it can be, and that can include a myriad of modifications. If you want to know everything you could do to optimize your landing page, you’ll need a pretty expansive guide. And, guess what, we have one here. Present a really good offer.You could argue that anything free qualifies as “good,” but that isn’t exactly true. Not only should your offer be free (we’re not talking sales pages here) but it also has to be good enough to warrant a stranger giving you their personal information. Let’s face it — there are a lot of companies competing for your audience’s attention, asking for their information and soliciting them via email. So, what’s going to make you stand out from the pack? An outstanding offer, that’s what. Here are a few questions to determine if you have a compelling offer or not:
Decrease page load time.A single second delay in page load time means 7% fewer conversions and 11% fewer page views. Slow page load times can also result in customer dissatisfaction and frustration. Needless to say, landing page load time is a metric to take seriously. If you need some tips, check out this resource on decreasing page load time. Keep the buyer’s journey in mind.Since you’re driving traffic to your landing page, you should have a clear idea of where your visitors are in their buyer’s journey. That means you’ll know if they’re trying to diagnose a problem (awareness), looking for a solution to their problem (consideration), or are ready to close (decision). Your copy and offer should reflect this if you want to convert. It’s no different from any other marketing materials — meet your visitors where they are. Create a seamless experience.No one should be surprised when they arrive on your landing page. It should be exactly as advertised, meaning be consistent with your copy. Use the same words on your landing page that you used to get people to arrive there, whether it was a paid ad, social post, blog CTA, or email. You need to avoid the bait and switch at all costs if you want people to stick around. Create a clear path to conversion.There should be no guesswork involved in navigating your landing page. Once someone arrives on your page, it should be clear what you want them to do — submit their info to your lead form. Your goal is to guide visitors to your form using creative directional cues. Here are some ways to point your visitor to a conversion:
Add scarcity to your offer.Few emotional marketing tactics work as well as fear … and the fear of missing out (more formally known as FOMO). Consumers don’t like to lose their ability to choose, and once you make it clear that your offer is in high demand and/or short supply, they’re going to clamber to get it. (Here’s a cool study on cookie jars if you want to geek out on the psychology of scarcity marketing.) The other reason why this technique works is because people want things that are hard to obtain — that signifies value and exclusivity. To show scarcity, mention how little of your offer is left, include a countdown timer, use words like “ends soon” or “last chance”. Obviously, we want you to be genuine, so only employ tactics that are true for your business. Bottom line: there are many ways to use and benefit from this technique. Use video.Video marketing is becoming increasingly popular for good reason. Not only do customers prefer to see video from companies, but 88% of video marketers say that video gives them positive ROI. The key is to create an effective video that doesn’t distract visitors from your ultimate goal: the call-to-action. If you’re on the fence about using video, here are some reasons that might push you over the ledge. Video …
If you do plan to employ this tactic, VidYard has some helpful landing page video guidelines to follow. Are you excited yet about all the ways you can improve your landing pages? Sure, there are quite a few but that just means that a poor-performing landing page doesn’t have to stay that way. Take it one tactic at a time and build as needed. What to Do Post-Conversion: Lead NurturingSo, you have an optimized landing page that converts like a charm. Now what? You don’t want to leave those leads hanging. Instead, you want to nurture them into becoming customers, then nurture them some more. Here’s how. Optimize your thank you page.I hope you’re not tired of optimizing yet. Your thank you page is the first thing someone sees after they convert, so it serves as a great opportunity to delight your new lead even more than you already have. Your objective is twofold: deliver your promised offer and get them interested in something else on your site. Your thank you page should:
Guide them along their buyer’s journey.Your new lead is going to make their way to the decision stage with or without you. You want to be the one to help them get there. You’ve gathered some valuable information about your lead, which means you can anticipate what they need next. Provide content or resources to bring them to the subsequent stage of their journey, and you just might be their option for the decision stage. After all, we know that prospects buy from companies that they know, like, and trust. Form a relationship.Once someone signs up to receive information from you, they become a potential customer with whom you should work hard to build a relationship and connection. The good thing is you already know what they’re interested in and what their pain points are, so you can target them with additional, helpful content and personalized marketing. If you’re still stuck, get some inspiration from some of the best landing pages we could find. Grow Better with Landing PagesLanding pages will account for a majority of your new leads, so they demand your attention. With the vast number of tweaks, additions, and variations you can implement, there’s no reason why you can’t have a landing page that converts well. As long as you’re following the best practices we covered above, you’ll be on your way to a high-performing landing page … and if you need some additional guidance, we’re always here as a resource. Editor’s note: This post was originally published in August 2019 and has been updated for comprehensiveness.
Original Entry: The Ultimate Guide to Landing Pages is shared from https://blog.hubspot.com/marketing/landing-page-best-practices via https://blog.hubspot.com/marketing Check out the original post, The Ultimate Guide to Landing Pages that is shared from https://putyourfamilyfirst.wordpress.com/2020/11/11/the-ultimate-guide-to-landing-pages/ via https://putyourfamilyfirst.wordpress.com A blog is a critical component of your inbound marketing strategy — it’s the vehicle for driving traffic, generating leads, and establishing authority and trust… All in the early or middle stages of the buyer’s journey. But how do you know if it’s working? With all that content, traffic, and leads you’re generating, are you aware that you’re sitting on a gold mine of valuable data? Enter… Blog analytics. In this post, we’ll cover:
By measuring performance based on data, you can identify what’s working, what’s not working, and why. Why Blog Analytics MattersLet’s say a key stakeholder in your company comes to you with this question: “How is the blog contributing to our goals?” They want to craft the marketing budget and put their dollars toward the activities that make the most difference to the bottom line. Responding to their question with “Trust me” will not sway that individual to continue celebrating and investing in content marketing. By gathering and analyzing blog data, you can get a pulse on your blog’s:
All of this data is leverage as you prove the ROI of the blog and improve the performance of your blog content. You just have to know how to use it! Let’s dive deeper on this… Blog Analytics Metrics and InsightsLet’s break down the individual blog metrics you should be tracking so you can start making incremental improvements and generate even more traffic and leads… based on data that’s right under your nose. 1. Organic Search ImpressionsAn “impression” is the number of times your post or page has been seen in the Search Engine Results Pages (SERPs). The higher your blog posts rank in the SERPs, the more visibility (and, as a result, traffic) your blog can earn through organic search. If you have a low number of impressions, your search presence may not be strong enough to get the organic traffic numbers you’re after, and it’s your job to then implement SEO best practices and create content around queries that people are searching for. 2. Organic ClicksIt’s not enough to simply be present on the SERPs, which is what impression data measures. Your content must be compelling enough to compel the searcher to click. The more organic clicks your content earns, the more traffic your blog receives. If you’re finding that your clicks are low, first check your impressions. If impressions are low too, you must work on increasing your impressions. On the other hand, your impressions could be lower if your content is targeting a low-volume query (i.e. you can’t change search behavior and make people search for something more). However, if you’re finding that your SERP positions and impressions are high and your clicks are low, you may have to work on your title (blog headline) and meta-description to gain attention and earn more clicks. 3. Organic Click-Through RateComparing organic impressions to clicks can be hard, but that’s where organic click-through rate comes in. This metric is the percentage of impressions that resulted in a click. The higher the percentage, the more bang you get for your impressions buck. You can even have posts that get little traffic (because of low keyword volume) that rank highly, get a lot of impressions, and earn a high share of clicks from those impressions. At the same time, you could rank lower for a high volume query yet still drive a lot of traffic with a low click-through rate. 4. Total Views and VisitsA visit measures the number of times your website was seen by a user. Page views refer to the number of times a page was seen by a user. It’s important to keep in mind that there can be multiple page views for every visit since users can browse multiple pages in a single session. These overall metrics can tell you:
(And more…) 5. Individual Post PerformanceThe number of views for individual blog posts can give you more granular data about how your audience responds to the different topics you’re blogging about.
Do you notice that posts about certain topics aren’t doing as well as others? This is likely an indication that those topics aren’t as important to your audience. If this is the case, you might want to publish fewer posts on those topics and more on topics that truly resonate with your target audience. Blog post views can also help you identify other patterns and cues in your blog content. Does a certain title structure work better than others? Do posts that are more pontificating generate a better reaction than how-to type posts? Use all of these insights to inform your future posts to increase the value of your blog and generate better results. 6. Traffic Referral SourceYour blog’s referral sources will tell you where (which sites) users are coming from and give you a sense of how people are finding your blog. Use this information to identify deficiencies in your blog’s visibility and to help diagnose why you may have low traffic to your blog. Is the bulk of your traffic coming from social media sites per your heavy social media promotion but few visitors are coming in from organic search — or vice versa?
Make sure you’re optimizing your blog content with the keywords your target audience is searching for so it gets found in search engines, and allocate some resources to promoting your blog on the sites your audience tends to populate. Continue to track your referral sources as you ramp up promotion in certain channels so you can determine the ROI of leveraging one channel over another. A lot of focus on social media promo that yields few visitors might not be the best use of your time when another channel is a better driver of blog traffic, for example. 7. Number of Inbound Links“Inbound links” refer to the links that your blog earns from other sites. Inbound links, or links from other websites and blogs pointing to your blog content, can indicate how authoritative your blog is. Think of inbound links as votes of confidence. If someone thought your blog content was worth linking to within their own content, it’s a good indicator that content is an authoritative resource on the subject. Inbound links can also show you how effectively your blog is contributing to your website’s overall SEO, since inbound links are one of the most powerful factors impacting search engine optimization. They can even help you generate blog traffic from the referring website and expose you to brand new audiences. Individual inbound links will also help you identify some of your blog’s top content that you might consider using as fodder in social media updates, new blog posts, or ebooks. 8. Time on Page“Time on page” measures how long a user stayed to engage with the content once arriving on the page. It can* be a good indicator of how engaging the content is to your blog visitors. The idea is that the longer they stay, the more time they took to read the information rather than skim and bounce away (more on that later). *However, take this metric with a grain of salt. Shorter posts take less time to read and, as a result, have shorter time on page averages. Also, if you take time in making your posts easy for the user to navigate and find what they’re looking for, you may get shorter times for this reason (and that’s okay!). 9. Bounce RateBounce rate will tell you how frequently visitors leave your blog without visiting other pages on your blog. While this is a great indicator of the quality of your content and the stickiness of your blog overall, don’t be fooled by some implications of bounce rate. While you’d probably want visitors to stick around and read other articles on your blog, you probably wouldn’t consider it a bad thing if a visitor clicked on a CTA at the end of your post and headed over to one of your landing pages to fill out a lead-capture form, right? That being said, if people are quickly leaving your blog for a completely different website, you’ll want to take some measures to increase the quality of your content. To help decrease bounce rate, consider adding a sidebar widget to your blog that features your blog’s best-performing posts and switching up the homepage of your blog to show a preview of your 5 most recent posts rather than a full view of your most recent post. This will give visitors the ability to choose to read more posts that cater to their individual needs, enticing them to stick around. 10. Social Shares and Comments
Comments and social shares are good supplementary metrics to indicate the likeability of your content and the sentiment of your audience’s perception of it. In addition, comments and social shares can be a great way to identify strengths and weaknesses in your content and help you generate ideas for new content. If you’re noticing few social shares of your content, make sure you have social sharing buttons installed on every blog article you publish. Be sure that you’re also spending time promoting on social media. 11. Subscriber CountYour blog’s RSS subscriber and email subscriber count can indicate how much your blog’s stable community of readers is growing over time. Visitors who subscribe will likely make up your blog’s solid readership, and it usually indicates your content’s true fan base. These readers are most likely to share your content with their own networks, expanding your blog’s reach, so you’ll want to do some work to build up your subscriber count and track its growth over time. Make sure you display email and RSS subscribe buttons prominently near the top of your blog’s sidebar to encourage new visitors to subscribe to your content.
12. CTA Click-Through RateA view on your blog post or a social share is not the end-all be-all. You actually want your blog to make a meaningful impact on revenue… and traffic is only part of that equation. With that in mind, if no one is clicking through from your blog to your landing pages, you’ll never generate any leads. That’s where CTA click-through rate comes in. CTA click-through rate measures the percentage of visitors who clicked on your blog’s CTA. The higher the CTR, the more effective your CTA is for the traffic your blog is currently generating. But a low CTR could mean a few things:
To improve your blog’s click-through rate, make sure the offer you’re presenting aligns with the content of your posts as closely as possible, uses compelling button copy that clearly demonstrates the value of the offer, creates a sense of urgency, and that the button utilizes an attention-grabbing design. Conducting some A/B tests is a great way to optimize for the best calls-to-action for your blog to improve click-through rate.
13. Number of LeadsObviously, the number of leads generated will tell you how effectively your blog is supporting lead generation. Is it trending up or down? Are they the right kind of leads? To make sure you have your bases covered here, tell your readers what action you want them to take. Make sure that:
Knowing the number of leads attributed to your blog can also help you diagnose other deficiencies in your blog’s performance. 14. Goal Conversion RateThe goal conversion rate measures whether your blog readers completed the action you wanted them to (the goal) to convert from a visit to a lead. As opposed to the number of leads metric which tells you how much you’re generating leads for your business, conversion rate tells you how effectively you’re doing it. Keep in mind that conversion rate is highly dependent on your existing traffic. So if you have low traffic but an amazing conversion rate, you might generate leads at the same rate as you would with high traffic but a low conversion rate. Coupled with the knowledge of your blog’s CTA click-through rate, you can gather some pretty awesome insights. For example, if you have a high click-through rate but a low conversion rate, this means that while you’re getting visitors to click on your CTAs, they’re abandoning your landing pages before completing the form to convert into a lead. If this is the case, you likely have a conversion problem that can be due to a number of things: the messaging in your CTAs don’t align with the messaging on their landing pages or you could have a number of very landing page-specific problems. Start first with testing better alignment between your CTAs and their landing pages, and if that doesn’t do the trick, dive into landing page optimization testing. 15. Lead-to-Customer Conversion RateYour blog’s lead-to-customer conversion rate will tell you how effectively the leads you generated from your blog turned into customers. This insight becomes valuable when you’re examining and comparing the effectiveness of your multiple marketing channels against each other. If your blog is one of your top customer-producing channels, it might make sense to allocate more time and human resources to it. If it’s not, the opposite might be a better approach. Now, all of the above are fantastic metrics to measure the performance of your blog. But how do you get the data? Below are blog analytics tools that can help you gather and analyze blog data. 1. Google Search Console
Google Search Console is a free tool that helps website owners measure and analyze their presence on Google. Based on the data that is provided by Google themselves, you’ll be able to track:
Google Search Console also provides the ability to segment based on individual pages, individual queries, countries, and devices. You’re also able to compare date ranges to show change over time. The only thing you need to do to get access to this data is enable it is sign up and verify ownership of your site. 2. SEMrush
SEMrush is a third-party tool for measuring search presence and rankings. You can use it to track positioning changes over time, monitor your inbound link profile, and optimize content for SEO. What makes it different is that SEMrush goes beyond providing the data and into helping you uncover actionable insights. You’ll be able to do keyword research and uncover strategies to help your blog perform better, and you can also do competitive analysis to understand what your competitors’ search presence is like. 3. Arel=”noopener” target=”_blank” hrefsArel=”noopener” target=”_blank” hrefs is a similar tool to SEMrush for tracking search performance and performing keyword research and competitive analysis. With this all-in-one SEO tool, you’ll have access to keyword data, site auditing, and rank tracking. What makes Arel=”noopener” target=”_blank” hrefs special is its SERP feature tracking, helping you understand exactly what your users are seeing when they perform a particular query. 4. Google Analytics
Whereas Google Search Console helps you understand and measure your positioning and performance on the SERPs, before users get to your site, Google Analytics helps you understand what happens after they get to your site. It’s a free tool. In order to implement Google Analytics, you must set up an account and implement the Tracking ID with a JavaScript tag. Once this tag is in your site’s code and functioning properly, it can then gather data about your site’s users from that point forward (i.e. no back data is available previous to the script being installed). Google Analytics can help you understand:
There are many metrics to look at within these larger buckets, and Google Analytics also provides ways to filter, segment, and compare various metrics. This can help you determine if you’re getting the right traffic, if that traffic is trending up or down, and if they’re navigating and converting how you want them to. 5. HubSpot
HubSpot is a CRM platform that also has marketing, CMS, sales, and service tools to help your business grow better. The advantage of using HubSpot for blogging is that you can monitor the performance of your posts and tie that data into CRM records, helping your team see all of their marketing interactions. This helps you be able to track the complete customer lifecycle from initial blog view to becoming a customer and beyond. 6. StoryChief
StoryChief is a tool for centralized content management ranging from publishing to blog analytics and content insights. Its analytics, reporting, and data management features help you analyze your data, track trends on top-performing content, and guide you to insights for creating buzz-worthy content. The edge it has over something like Google Analytics is its intuitive interface. (Fun fact: It also integrates with HubSpot.) 7. TableauTableau is a data management software that can help you create data visualizations that can lead you to valuable insights. It works by integrating multiple sources of data and allowing you to drill-down, filter, and build graphs and dashboards to spot trends and forecast opportunities. Whatever tools you decide to use as you focus on the metrics that matter to your blogging efforts, keep in mind that data alone is not enough to create an actionable strategy. It’s important to understand the context of the data and be able to interpret insights into the inbound marketing activities that will generate ROI. Editor’s note: This post was originally published in January 2012 and has been updated for comprehensiveness.
Original Entry: 15 Amazing Blogging Insights Your Analytics Can Tell You is shared from https://blog.hubspot.com/blog/tabid/6307/bid/30737/10-amazing-blogging-insights-your-analytics-can-tell-you.aspx via https://blog.hubspot.com/marketing Check out the original post, 15 Amazing Blogging Insights Your Analytics Can Tell You that is shared from https://putyourfamilyfirst.wordpress.com/2020/11/11/15-amazing-blogging-insights-your-analytics-can-tell-you/ via https://putyourfamilyfirst.wordpress.com 
As a digital marketer, you know just how important the tone and message of your blog are to the overall success of your business. A cohesive approach to your digital content, especially the content on your blog, is critical to your brand. The best way to ensure your site is editorially cohesive is with an editorial style guide. This article will walk you through the basics of an editorial style guide. You’ll learn the steps you need to follow to create your own style guide whether from scratch, with the use of a template, or with help from a freelancer. What is an Editorial Style Guide?An editorial style guide is a set of guidelines for the writers and editors on your team. These guidelines will include standards for grammar, spelling, sentence structure, and image use. The goal of a style guide is to ensure your content stays consistent and high quality no matter who is writing or editing the article. Why Does Your Website Need an Editorial Style Guide?More than just a preferred list of grammar rules, an editorial style guide provides your content team with guidelines for the creation of useful, on-brand content. An editorial style guide ensures a standard baseline for quality and consistency. This will become more critical as your in-house editorial team grows. Perhaps you think your website is too small, or you can always create your content now and flesh out the details later. The truth is, the sooner you can get your editorial style and processes nailed down, the less work for you and your team. Without clear guidelines in place, your inbox will soon be flooded with questions from your writers and editorial staff. Your editorial staff may think that lack of guidelines gives them free reign over content. This may result in inconsistent and maybe even poor quality work that has your brand name all over it. Elements of a Style GuideThere are specific elements all style guides should include, such as: GrammarDo you expect your writers to use the Oxford comma? Are there instances where you prefer the semicolon over the em-dash? These are the grammatical rules to call out in your style guide. Other grammatical elements to take a stand on include where punctuation falls in relation to quotation marks (inside or outside), prepositions at the end of a sentence, and starting sentences with conjunctions. SpellingA subscription to services like Grammarly takes care of the majority of misspellings. There may be times where a word can be spelled correctly in two or more ways, so which one should your writers choose? The most common spelling differences are those with American English versus British English variations. Examples include:
You should consider where the majority of your audience lives when deciding on a spelling “style.” But the most important thing is to choose one style and be consistent. Voice and ToneThe voice is the overall expression of your brand, while the tone is how that message is delivered. The tone will vary depending on the medium (e.g. social media post, blog post, newsletter, press release), but the overall brand voice will be your writers’ guiding light. Is your brand voice considerate and simple like Uber or functional and expressive like Starbucks? Once you have found your brand voice’s sweet spot, it’s time to determine what your tone is and when that may change depending on the medium or circumstances. Perhaps your tone is casual and conversational in blog posts, but witty in social media posts. You’ll want to include relevant examples here as Uber does in the Applications section of their style guide. These will help to solidify your stance while also giving your writers a handy guide to refer to should they need it. Sentence and Paragraph LengthFrom witty one-liners to groupings of five to six sentences, there are many valid ways to form a paragraph. Here you want to outline your general preference and when exceptions should be made. On academic websites, for example, longer sentences and paragraphs are the norm. This is because there is a lot of high-level information that needs to be delivered at once. On recipe or hobby blogs, however, shorter sentences and paragraphs can help to drive a point home. LinksThis section of your style guide should discuss how links on your blog should be formatted, but also how often to use links and to where (e.g. external versus internal content). If you’re a medical or academic marketer, for example, you may require that links to outside sources meet a minimum quality standard. If that’s the case, you should provide explicit examples of websites and sources that you trust. ResourcesYour editorial style guide should be in-depth, but if it’s too long it can be difficult for your writers and editors to use effectively. One way to reduce your style guide’s length without compromising content is with resources. The resource section of your style guide should include links to guides that you have properly vetted. These may include:
You want to set up your writers to be self-sufficient. An expansive resource section within your editorial style guide is a great place to start. Images and Other Media in an Editorial Style GuideIf you encourage the use of images and other media in your website content, you’ll need to be explicit about formatting, attribution, content, and more. What do these elements cover?
There are very real potential consequences to improperly attributed imagery, so this part of your style guide should be very specific. It’s best to provide examples and even templates for your writers and editors to use. Creating Your Editorial Style GuideNow you’re ready to create your own style guide. Where should you begin? Before you become overwhelmed with the process, let’s discuss three ways you can go about creating your own style guide. Hiring a Freelancer to Create Your Editorial Style GuideYou can hire a freelancer for just about any blog or website-related task, so why not consider hiring a freelancer to create your style guide? Freelancers with experience in writing industry-specific content, including style guides, do exist. If you can find a freelancer with experience creating a style guide in your field, then even better! There are various freelance recruitment platforms, such as Freelancer and Upwork. You can also reach out to your personal and professional network for recommendations. An experienced freelancer can walk you through the process of editorial style guide creation. You should come to the table with some information prepared, though. For example:
You hired the freelancer for their knowledge and expertise, so don’t forget to utilize it. If your freelancer has created an editorial style guide in your niche, then ask them for recommendations based on their previous work. You may be surprised at the sections you didn’t even think to add, and others that you can cut. Using this previous experience can boost the quality of your style guide and prevent issues caused by ambiguity. Creating an Editorial Style Guide From a TemplateIf a freelancer isn’t in your budget, you don’t have to go it alone. There are many style guide templates available for you to work with. The best place to look for such templates is on marketing, branding, and design blogs. TechWhirl offers a Word document template for download, and Lucidpress has its own template you can customize using their online editor. You may also have luck with template repositories like this one from Microsoft. The important thing to remember is a template is a guide, not a rule book. You don’t need to include all of its sections, and you’re free to add any sections you feel necessary. Creating Your Own Editorial Style GuideIf you prefer to create your own style guide from scratch, then consider the step-by-step process outlined below. Start With a Solid BaseAt this stage, it’s time to choose an established style guide as your base. There are plenty of options as described below, including APA and MLA. By choosing one of these guides as your baseline, you make it easy to create the foundation of your style guide. These established guides already include rules on grammar, structure, and formatting. You can then build upon those rules to create a robust editorial style guide for your website. Establish Brand Voice and Set the ToneTwo critical elements of marketing content are often overlooked: brand voice, and tone. The reason these are so often overlooked isn’t because they’re unimportant, but because they can be difficult to distinguish. The voice is your brand’s personality. This remains the same throughout the life of your brand. Skittles, for example, has a playful and upbeat voice. Their marketing campaigns are slightly fantastical with an eye towards bright colors, loud sounds, and catchy quips. 
The tone is the inflection on your brand voice that will change depending on the situation. Even if you have an army of writers, you can ensure your blog stays cohesive by setting a tone for your writers and editors to abide by. Remember the Big Three: Tense, Voice, and Point of ViewNow you know the tone of your content, it’s time to outline the “how-to.” How do you intend for your writers to speak to your audience? The answer will depend on the tense, voice, and point of view you prefer. Writing tense refers to the three tenses: past, present, and future. There may be reasons all three tenses are used on your website or blog. You should still pick a dominant tense for your writers to defer to in most circumstances. Voice refers to active voice versus passive voice. That means putting the subject first (active) or putting the object first (passive). Active voice is the standard for most bloggers and marketers. It offers a more conversational tone readers find compelling. Point of view refers to the perspective of the writer: first, second, or third person. Bloggers and marketers will typically utilize first person (“I” statements) or second person (“You” statements). The point of view you choose will depend largely on your content niche and your overall tone. It’s best to have a default recommendation for all three of the above. You may include exceptions to the rule, but be sure to provide specific examples if you do so. Establish Standard FormattingThe way your content flows is largely dependent on its formatting. Some basic formatting guidelines to consider are headers and subheaders, bold and italic text, and hyperlinking text. You may want to consider your content management system and any potential limitations when it comes to header tag guidelines. If you are heavily relying on a style guide such as the APA, you can utilize their recommendations for text formatting. For example, italicizing terms that have a technical or special meaning. Define Image RequirementsThere are many good reasons to include imagery on your website. However, images can take up precious space, and they come with their own copyright risks. This is why you must define image requirements within your style guide. On the technical side, you should define minimum and maximum image size. This will largely depend on your content platform, and it may vary by image type (featured image versus in-content image). With copyright infringement always being a risk, you also want to provide strict requirements when it comes to including images in content. If you use a premium image repository, like Shutterstock, you may include account login details in this part of your style guide. You can also link to free image repositories such as Unsplash or Pexels. Beyond that, you should clearly outline (with examples) the desired format for image references. What should be included, and how should it be formatted? Again, it may be helpful to fall back on your chosen style guide’s standard. Incorporate Standards of PerformanceHow will your writers know when they hit the nail on the head or, conversely, miss the mark? This is where standards of performance come in handy. Standards of performance are guidelines that your writers and editors can refer to when evaluating their content piece. The more objective your standards of performance, the better. When it comes to establishing standards of performance, it helps to think of a grading rubric. For each standard, it’s possible to score anywhere from one to five points. What standards can you choose that will be easy to evaluate on a five-point scale? A few examples include:
The standards of performance will be beneficial to your writers, as well as your editorial staff. Picking a Preexisting Editorial Style Guide as a BaseThe likelihood is something will inadvertently be left out of your editorial style guide. This is why having a default style guide for your writers and editors to refer to is crucial. These style guides have typical use cases, though they can be adapted for uses beyond the norm. Let’s look at the four most common style guides. Associated Press (AP)The Associated Press (AP) style guide is most commonly used by journalists. Its focus is on disseminating information clearly with simple formatting. American Psychological Association (APA)The American Psychological Association (APA) style guide is most commonly used in college in science and social science courses. It has a slightly more formal bent than the MLA, though not so formal as the Chicago Manual of Style. This style guide is ideal for academic writing, including blogs or websites dedicated to discussing academic subjects. Modern Language Association (MLA)The Modern Language Association (MLA) style guide is most commonly used in college-level English courses, and it’s also the default for many bloggers, marketers, and content writers. This guide offers a more laid-back approach desirable to writers, editors, and readers alike. Chicago Manual of StyleThe Chicago Manual of Style is the most rigorous of the style guides. This style guide isn’t a popular choice for most bloggers due to its meticulous nature. The key differences between the four style guides are largely related to formatting, though there are some grammatical and structural variations as well. There isn’t one style guide better than the other as they all have their strengths and weaknesses. The guide you choose will depend largely on preference, ease of use, and familiarity. Picking a Platform to Host Your Editorial Style GuideYou’re ready to create your style guide, but where should you host it? You have a few options, and they each have their pros and cons. Microsoft WordA word document is perhaps the simplest option. The most obvious limitation of word documents is the inability to automatically update the guidelines. You would need to send the updated document out to all writers and editors as additions or changes are made. Google DocsIf you like the idea of a simple document, then consider Google Docs. You will still have access to the basic content tools offered by a word document, but updates will be reflected live. You can also collaborate with members of your editorial team. SharepointPerhaps you want a more secure platform than Google. If that’s the case, then Sharepoint may be for you. Sharepoint is compatible with the Microsoft Suite, including Word. Using Sharepoint, you can upload an already existing Word document or create your own within the platform. Just like Google Docs, your changes are reflected immediately and you can collaborate with as many team members as needed. ConfluenceIf more robust collaboration is needed, especially when you’re just beginning to create your editorial style guide, you may prefer a platform like Confluence. This is a wiki-style platform that enables you to create your style guide with your team. Resources to Create a Quality Editorial Style GuideAs you create your style guide, you’ll find yourself going down many rabbit holes. With this in mind, we’ve compiled a list of helpful resources to get you started on your research. To familiarize yourself with institutional style guides, check out these resources on the AP, APA, MLA, and Chicago Manual of Style style guides. Are you finding yourself needing some inspiration? Take a look at the style guides created by institutions like Princeton and Rutgers. Your favorite companies and brands may also have their style guides publicly available, including Mailchimp, Google, and Atlassian. 
ConclusionAn editorial style guide ensures there is no ambiguity in your requirements. When utilized correctly, this style guide will help you to maintain a high standard of quality for your site and consistency across your written content. It can also clear up any confusion or questions from your team and contractors, to cut down on the back and forth questions. What unique elements will you be sure to include in your editorial style guide? The post How to Create an Editorial Style Guide appeared first on Neil Patel. Original Entry: How to Create an Editorial Style Guide is shared from https://neilpatel.com/blog/editorial-style-guide/ via https://neilpatel.com Check out the original post, How to Create an Editorial Style Guide that is shared from https://putyourfamilyfirst.wordpress.com/2020/11/11/how-to-create-an-editorial-style-guide/ via https://putyourfamilyfirst.wordpress.com 
Getting verified on social media is one of the first steps to building a successful social media marketing strategy. Whether it’s your personal account, your business account, or both, getting that little checkmark next to the profile name is massively important. And not so that you look like one of the ‘cool kids.’ A verified social media account provides instant social proof and credibility when anyone looks up to you or your company online. Verification can also help with networking and push your company to your industry’s forefront as a trusted option. Getting verified on social media can be a challenge, and it might take some time, but it is definitely worth it. But maybe you’ve already tried to become verified, and you were rejected. Or perhaps you don’t know where to start. Unless you’ve got a huge following like Beyonce, becoming a verified account takes some commitment and trial and error. 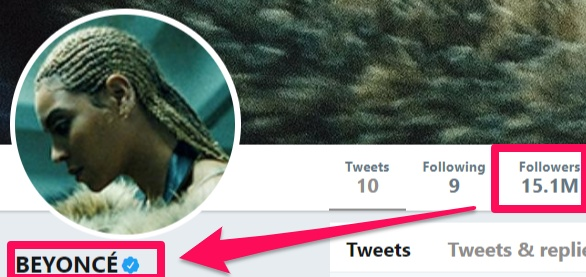
If you’ve tried to become verified before and you’ve been rejected, you’re probably not following the rules closely enough. For some sites, it’s a lot harder than others to show your worth. But don’t give up. I’m going to explain why your business isn’t verified on social media. We’ll then walk through how to become verified on Facebook, Twitter, Instagram, LinkedIn, YouTube, Pinterest, and Snapchat. Why Getting Verified on Social Media MattersTwitter was one of the first social media platforms to introduce verification, and it took a while for it to become as important as it is today. It began as a way for the platform to identify which Twitter accounts belonged to celebrities. Now, getting verified on social media tells users which accounts belong to brands, companies, and influencers. Basically, social media verification serves as an instant way to tell other users, “Hey, this account isn’t just your average Joe — pay attention to it!” This is especially useful for trying to target younger users, who are the prime social-media demographic. About 60% of Instagram users are between the ages of 18 and 29. Twitter is checked by 81% of Millennials every day. Having that badge of proof means that your account is worth following, paying attention to, and interacting with. It’s how you know it’s really me on Facebook: 
It immediately shows customers that any other accounts with that name are fake. Which isn’t as huge of a problem for me as it is for mega-brands like Walmart. Check out this fake Walmart YouTube account: 
Looks pretty legit at first glance, right? There’s an official Walmart logo as the profile picture, and the description even says, “Walmart Official YouTube Channel.” But upon further inspection, the account only has two video uploads and three subscribers. So this fake account was probably created to gain followers, create a scam, or even potentially destroy Walmart’s brand by impersonating the company. Based on the videos on this channel, it was probably created to use the Walmart name to gain subscribers or views: 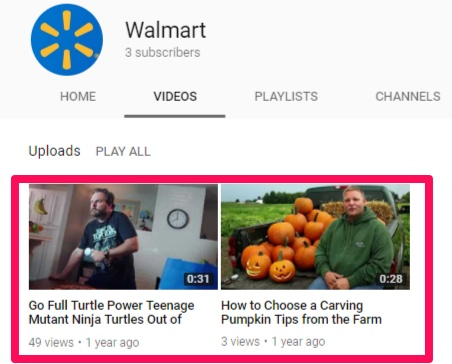
See how much trouble it is to find out if the account is real or not? Since it has no checkmark, we can guess it’s probably not the real deal. But not every brand or company is verified, including Walmart’s official YouTube page when I first wrote this article. (Today, they’ve jumped on the verification bandwagon.) 
So you can’t be sure until you evaluate things like the account’s number of followers and the kind of content on the page. If it had a checkmark, there would be no guessing or research. The benefits of verification are pretty easy to identify, and while the process can be easier said than done, it’s pretty painless overall. The processes for getting verified are unique to each social media platform. So let’s go through the big ones. Here’s how you can get verified on Facebook, Twitter, Instagram, LinkedIn, YouTube, Pinterest, and Snapchat. 1. How to Get Verified on FacebookFacebook’s blue verification checkmark identifies media organizations, global brands, or public figures (like Khloe Kardashian). The gray checkmark means that businesses (like Starbucks) or certain pages in specific locations are authentic. Facebook for Influencers
To verify your personal account to become an influencer in your industry, begin by ensuring that your Facebook page is updated. Add a recent profile picture and make sure your profile information is all filled out. If you haven’t been posting regularly (on Facebook or any social media platform), you’ll need to wait until you’ve regularly posted for a consistent amount of time before trying to verify it. You’ll also need to make sure your account is authentic, unique, complete, and notable, according to Facebook: 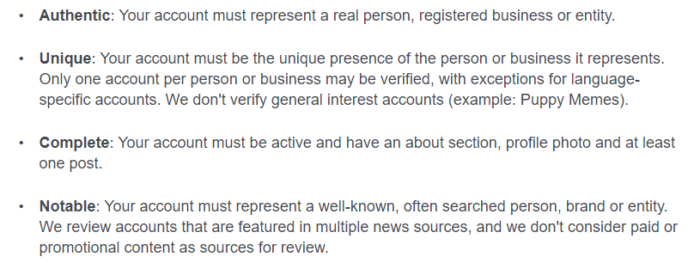
If you’ve completed these steps already, head to Facebook’s Request a Blue Verification Badge form. Select the kind of page you’re looking to verify and complete the form accordingly by providing an email address, official website link, and more: 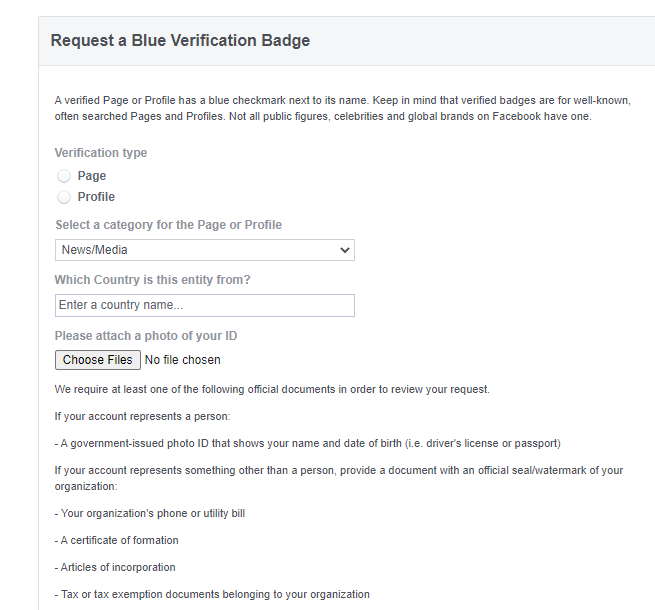
Be sure you have a digital copy of your ID since Facebook will use this upload to verify that it’s really you. Facebook will process the request within a few days, but it could take a few weeks, so be on the lookout for their reply. Facebook for Businesses
Business verification on Facebook confirms the account actually belongs to the business. To verify your business’s Facebook account, head to your Business Manager, then look for security settings. Note that not all businesses need to be verified — and you might not be eligible. For example, if you use Monthly Invoicing to pay for ads, you won’t have to submit any documentation. Once you find Security Settings, click on the Confirm Identity button. Submit a photo ID or upload the requested documentation. Enter your business details, then select your business from the list. Then, select a phone number you can access from the list provided or select Use Domain Verification button. You can also select to have the verification code delivered by text or email. Enter the verification code, and hit Submit. You should expect to hear back from Facebook about verifying a business page within a few days. You will get a notification on your personal Facebook page when it’s been approved. 2. Get Verified on TwitterAccording to Twitter, verification indicates an “account of public interest. Typically this includes accounts maintained by users in music, acting, fashion, government, politics, religion, journalism, media, sports, business, and other key interest areas.” So if your account doesn’t fit into any of these areas, trying to verify it is pointless. But if you do, Twitter gives some verification tips to increase your chances of getting verified. For example, you have to have:
Once you’ve met all these criteria, you can submit a formal verification request. (Note: Twitter sometimes puts their verification process on hold. If that happens, you’ll have to try back another time.) 
Be sure to fill out the form and include some backstory, in 500 characters or less, about why Twitter should verify your account. You’ll also have to provide some website links that back up your claims. 
You can expect to hear back from Twitter within about a week. 3. Get Verified on InstagramOut of all social media platforms, Instagram is probably the most selective when handing out verified badges. According to Instagram, “Accounts representing well-known figures and brands are verified because they have a high likelihood of being impersonated.” “We want to make sure that people in the Instagram community can easily find the authentic people and brands they want to follow.” So becoming verified was pretty easy for someone like Justin Bieber: 
If you’ve already got a huge following or you’re a mega brand, Instagram will probably go ahead and verify your page without you having to do anything: 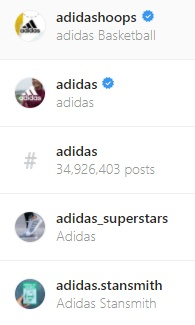
But if you’re not, focus on these two key tactics in the meantime:
If you take the time to make your account legitimate without having the official Instagram seal of approval, people will notice. And hopefully, after a while, Instagram will too. 4. Get Verified on LinkedInSince LinkedIn is like Facebook of the professional world, you might think that their verification process would be a lot like Facebook’s. But it’s not. The LinkedIn verification process works a little bit differently. LinkedIn hands out check marks on the LinkedIn Lookup app. These checkmarks prove that someone actually works for the company they’ve specified. 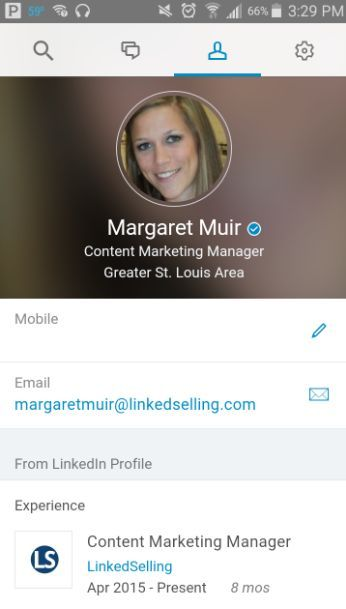
And this checkmark is miraculously easy to get. All you have to do is request verification from LinkedIn and wait for a four-digit code to land in your business email address. Then, enter the code into LinkedIn Lookup, and ta-da! You’re verified. However, if someone doesn’t have a checkmark on LinkedIn, it doesn’t necessarily mean that their profile isn’t legit. It probably just means they haven’t completed the verification process yet. Another way to prove your credibility on LinkedIn is to get an invite to its Influencer program, like Bill Gates. 
Since LinkedIn doesn’t allow people to apply to the Influencer program, your chances of joining the club with Bill Gates aren’t super high. But, LinkedIn will be more likely to notice you if you start publishing your content on their platform. You can also get a gold LinkedIn logo by upgrading to a Premium Membership as I did.
5. Get Verified on YouTubeVerifying your YouTube account and verifying your YouTube channel have almost nothing to do with one another, but they’re usually thought of as the same thing. Here’s the difference between each kind of verification and why they’re both important. Step 1. Verifying Your YouTube AccountUsually, this can be done once you first make a YouTube account. YouTube will remind you at the top of your video manager page to give a cell phone number to tie to your account. Once you’ve done this, and you should, YouTube will send you a verification code that you can enter in to prove that your account is real. Completing this step is crazy important because you’ll get to enjoy these additional features:
Step 2. Verify Your YouTube ChannelThis is that the almighty little checkmark is placed next to a YouTube channel name. 
And tons of creators are trying to get it. To get it, you’ll need at least 100,000 subscribers and then apply for verification. They’ll look to see if your channel is authentic and complete and give you the badge. 6. Get a Verified Account on PinterestBeing verified on Pinterest means that users will know that it’s really your company pinning to boards on the platform. It will display a red checkmark and your URL at the top of your page, like this: 
To start, make sure that the Pinterest account is a business one and not a personal one. Then, confirm your website. Next, include a “Pin It” button on your site. From there, change your profile picture to your business logo. To start, select the “Settings” option: 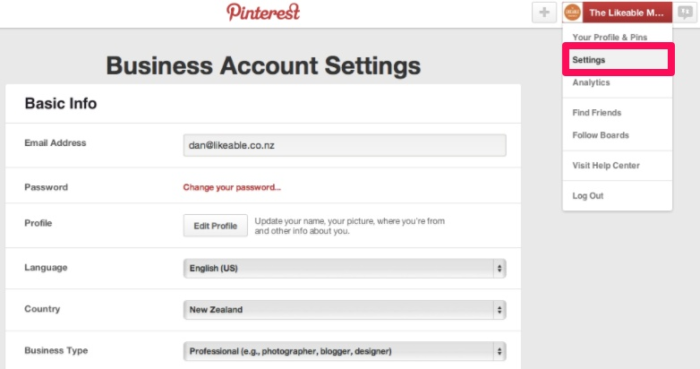
Scroll down to the bottom of the page where you added in your website URL. You’ll also want to connect your Instagram, Youtube, and Etsy accounts, if you have them. Then, click the Verify Website button to the right: 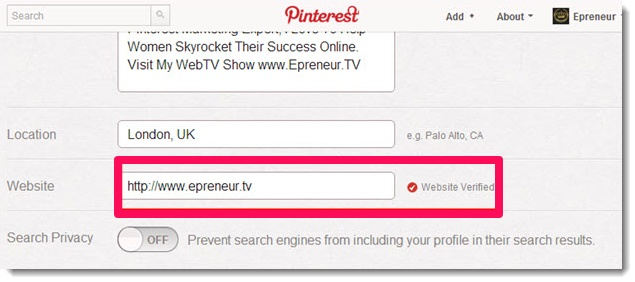
Click that, and the following instructions will appear. 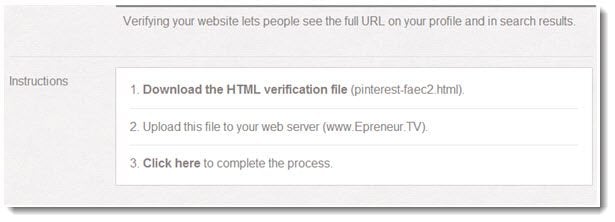
Follow each step accordingly, and Pinterest will notify you in a few days if you’ve been approved. 7. Get Verified on SnapchatOn Snapchat, verified users get something a bit different than the typical check mark. They get an emoji of their choice. For example, Kim Kardashian owns the 
This is important because it’s virtually impossible to find a Snapchat user unless you know exactly what their account name is. But with the use of emojis, finding any “verified” account becomes easy. You don’t need to know their account name. You can enter their actual name. Which is perfect for celebrity accounts like Justin Bieber or Kylie Jenner, since their account names are “rickthesizzler” and “kylizzlemynizzl.” 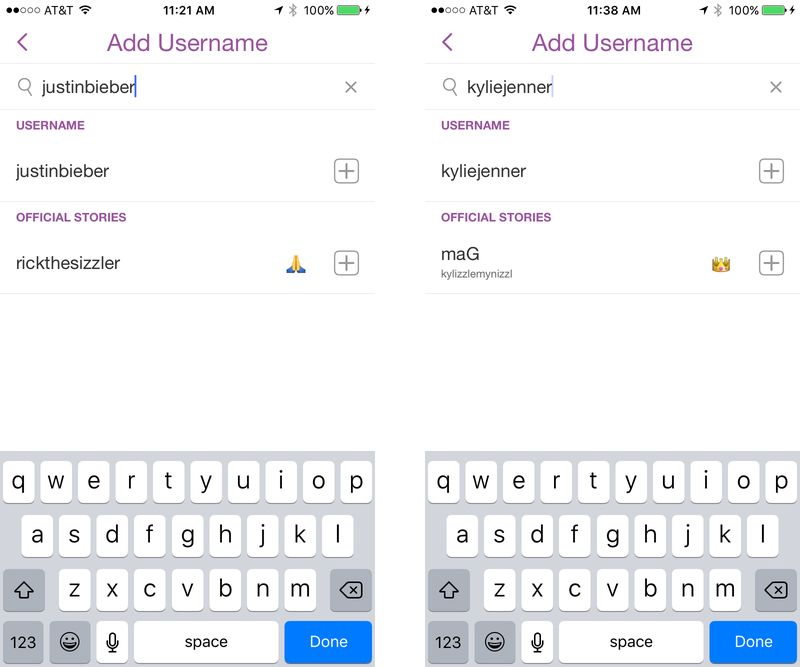
Snapchat has recently taken this a step further by providing a list of related accounts to follow when you scan a code with your phone’s camera: 
It looks like this will be the status quo for verification on Snapchat for awhile. If you have a substantial following on the app, reach out to Snapchat representatives and find out if your account is worthy of verification. You’ll have to provide some proof of your identity if you’re lucky enough to get them to agree to verify your account. If you aren’t a Snapchat VIP, it might not be worth taking these steps to verify your account. But, you never know if Snapchat will say yes or no, so it doesn’t hurt to just ask. You can contact Snapchat through their “Contact Us” web page. 
If they deny your request, you can always inquire about becoming verified at a later date once you’ve built an even larger following on their platform. The more followers and connections you have on the app, the better chances you’ll have of Snapchat verifying you on the social media app. 8. Get Verified on TikTokThere are two different types of social media verification on TikTok: the blue check, for brands and organizations, and the yellow check, for public figures and famous creators. 
Currently, you cannot apply to be verified by TikTok, but that option may be available soon. If you have any questions, the sites suggest sending an email to [email protected]. ConclusionGetting verified on social media isn’t a one-size-fits-all task. It actually isn’t even possible on all social media networks — Reddit, for example, does not verify any accounts. If you’ve tried to become verified on social media platforms and were rejected, try to follow the platform’s requirements more closely. Then, submit your request again once you’ve met all of the criteria. If you do it right, you can get those check-mark credentials that everyone desires to help you build brand awareness. Which social media platforms do you think are most important for verification? The post How to Get Verified on Social Media appeared first on Neil Patel. Original Entry: How to Get Verified on Social Media is shared from https://neilpatel.com/blog/social-media-verified/ via https://neilpatel.com Check out the original post, How to Get Verified on Social Media that is shared from https://putyourfamilyfirst.wordpress.com/2020/11/10/how-to-get-verified-on-social-media/ via https://putyourfamilyfirst.wordpress.com |
AuthorMy first job was working in a hotel as an assistant manager. I was responsible for the marketing and advertising, which is why I trained as a business coach. I moved into online marketing about 5 years ago. |
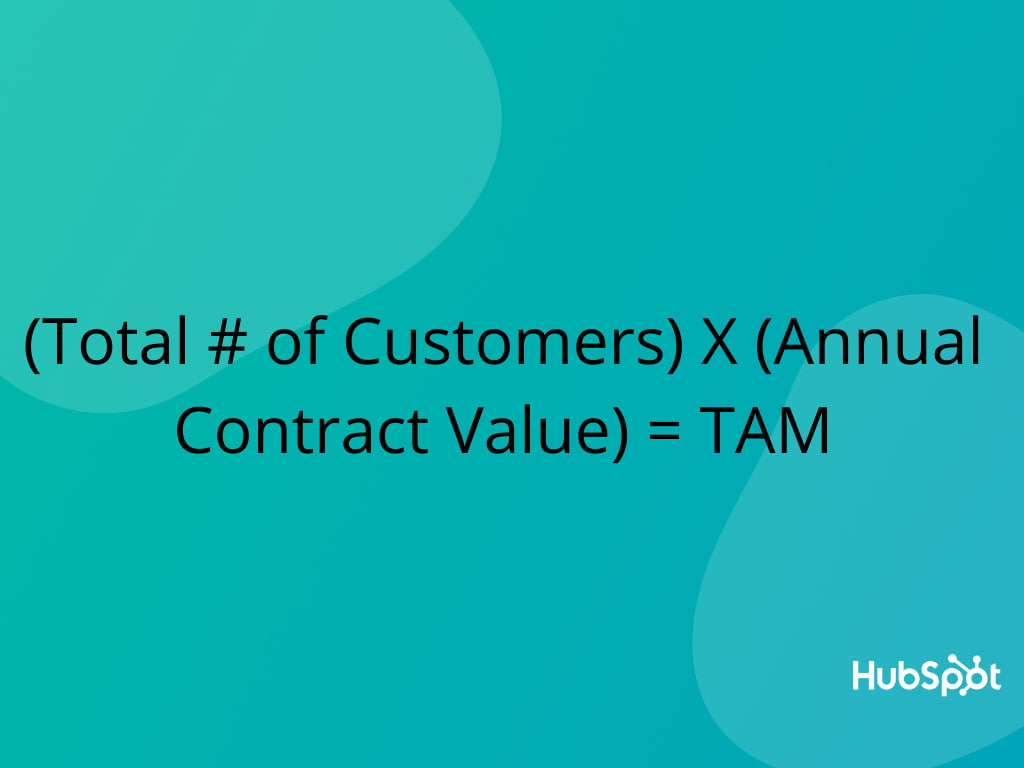
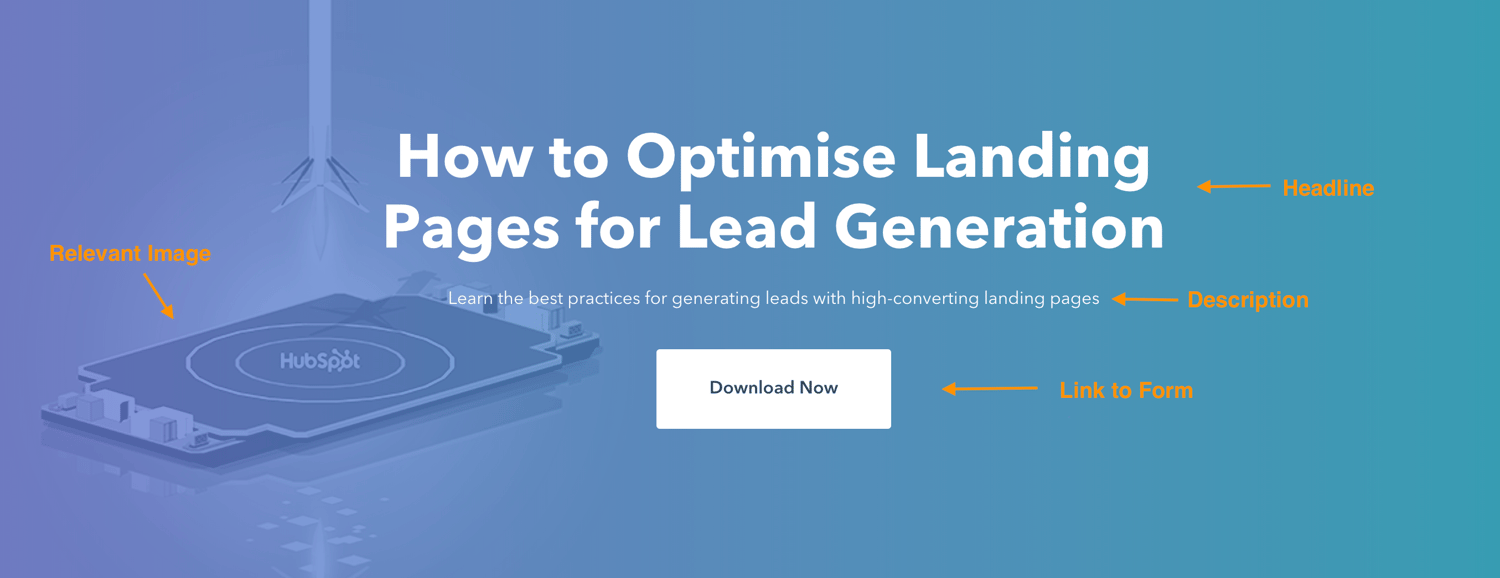
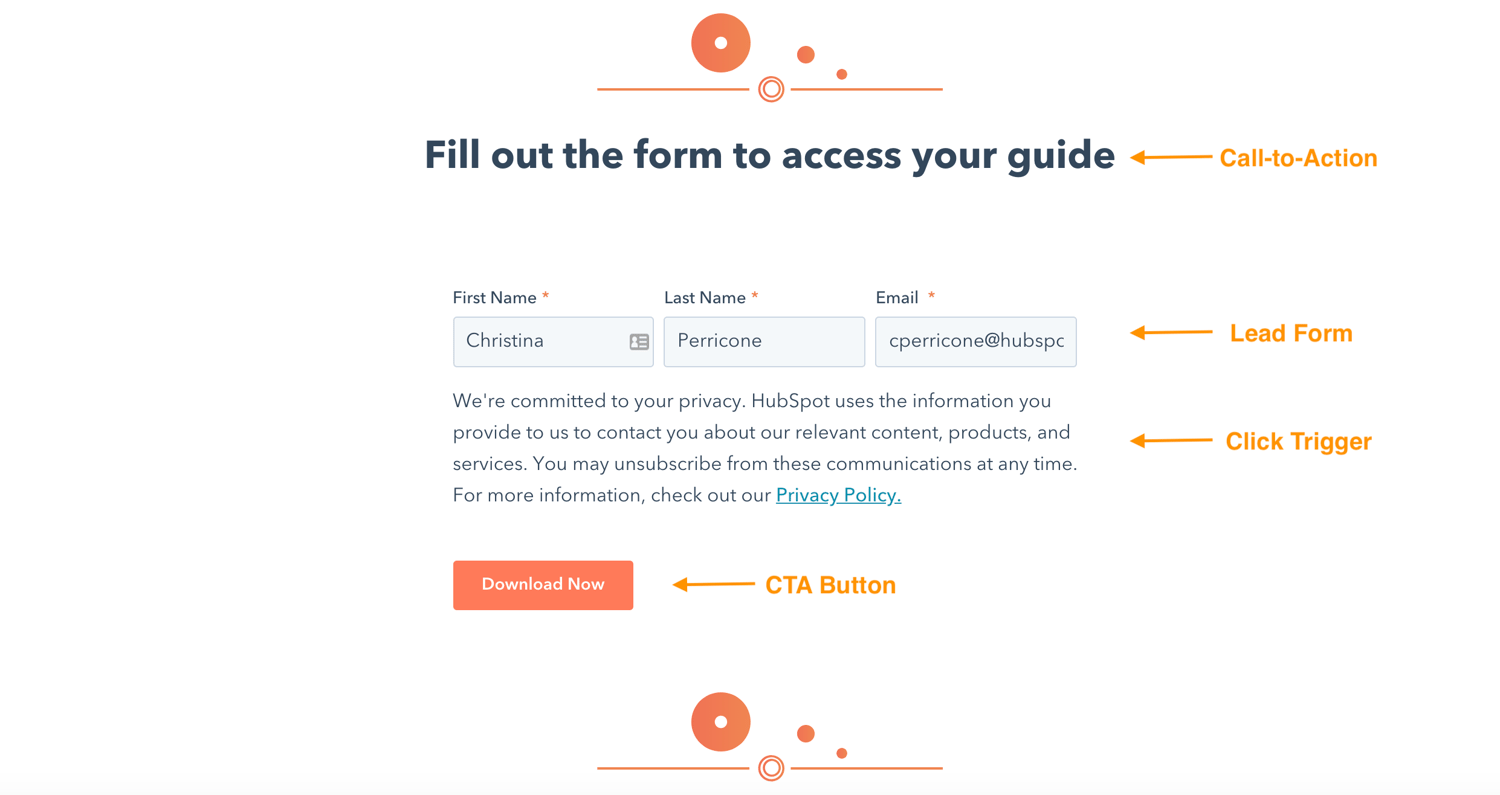

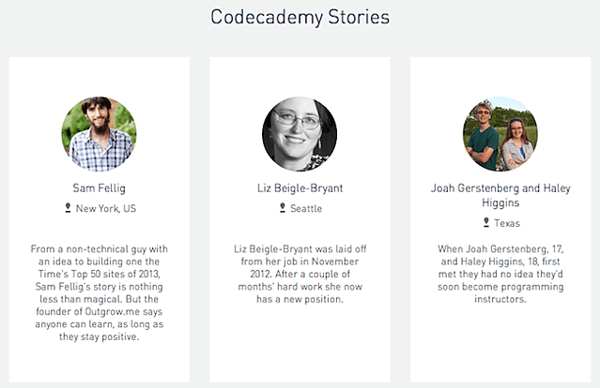
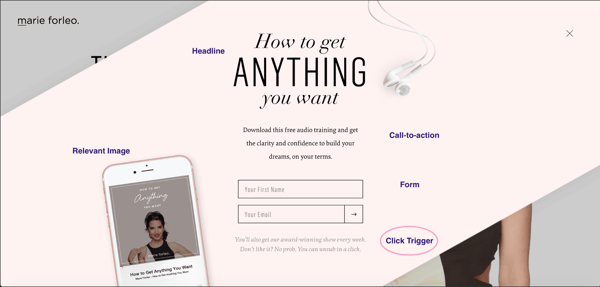
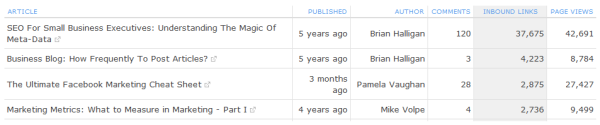
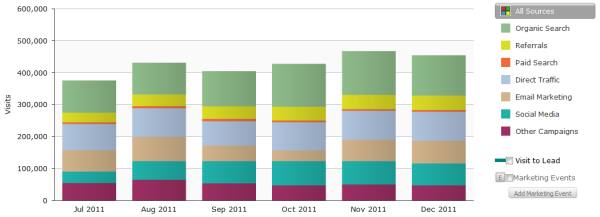
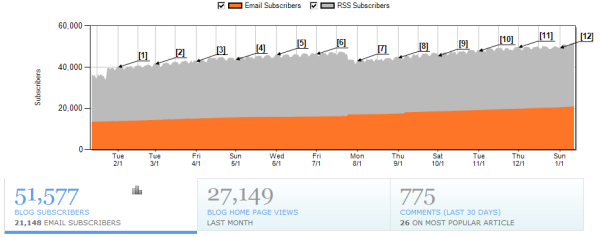
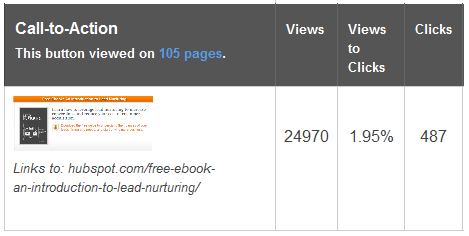
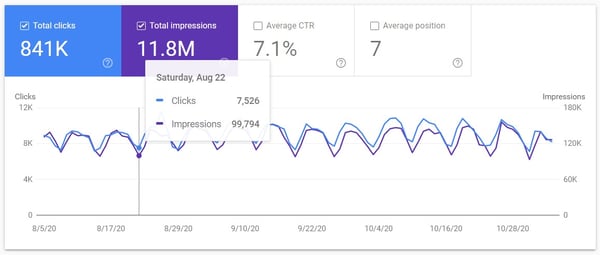
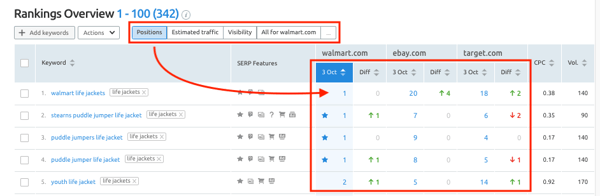
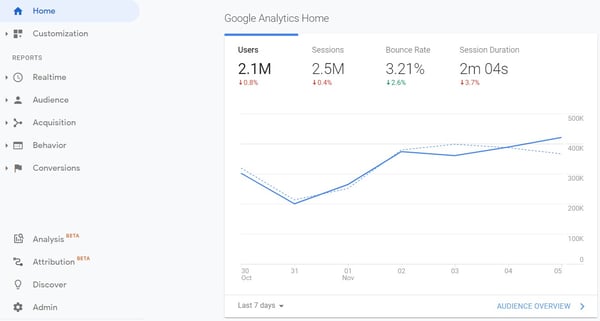
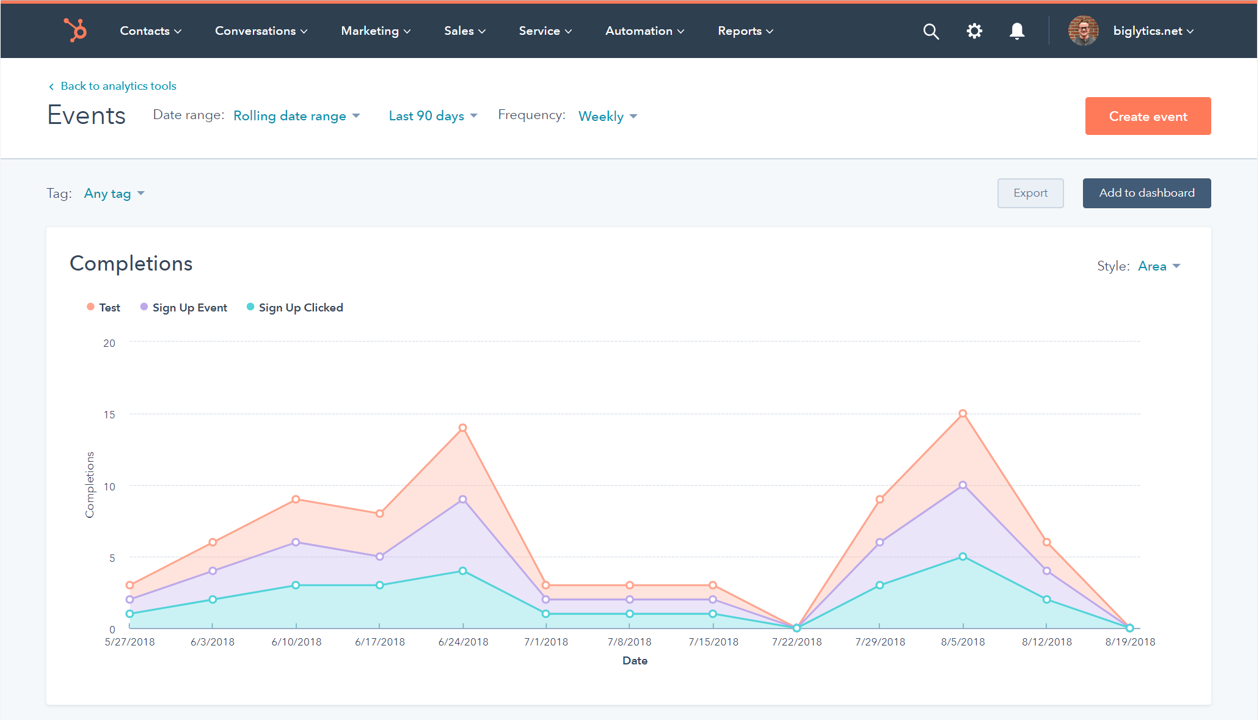
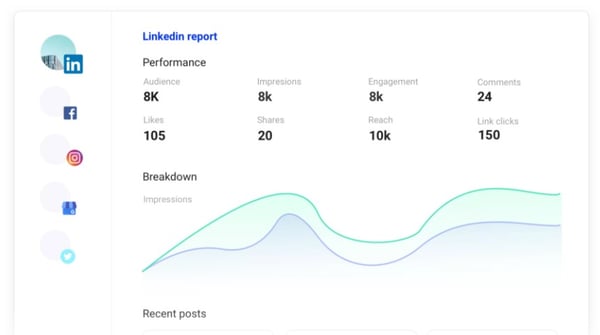
 emoji:
 RSS Feed
Photo from symphony of love
